
Soft Baked Red Velvet Crinkle Cookies

Tender, soft-baked red velvet crinkle cookies with white chocolate chips and a snowy powdered sugar crust—perfect for holidays, bake sales, or a cozy afternoon treat.

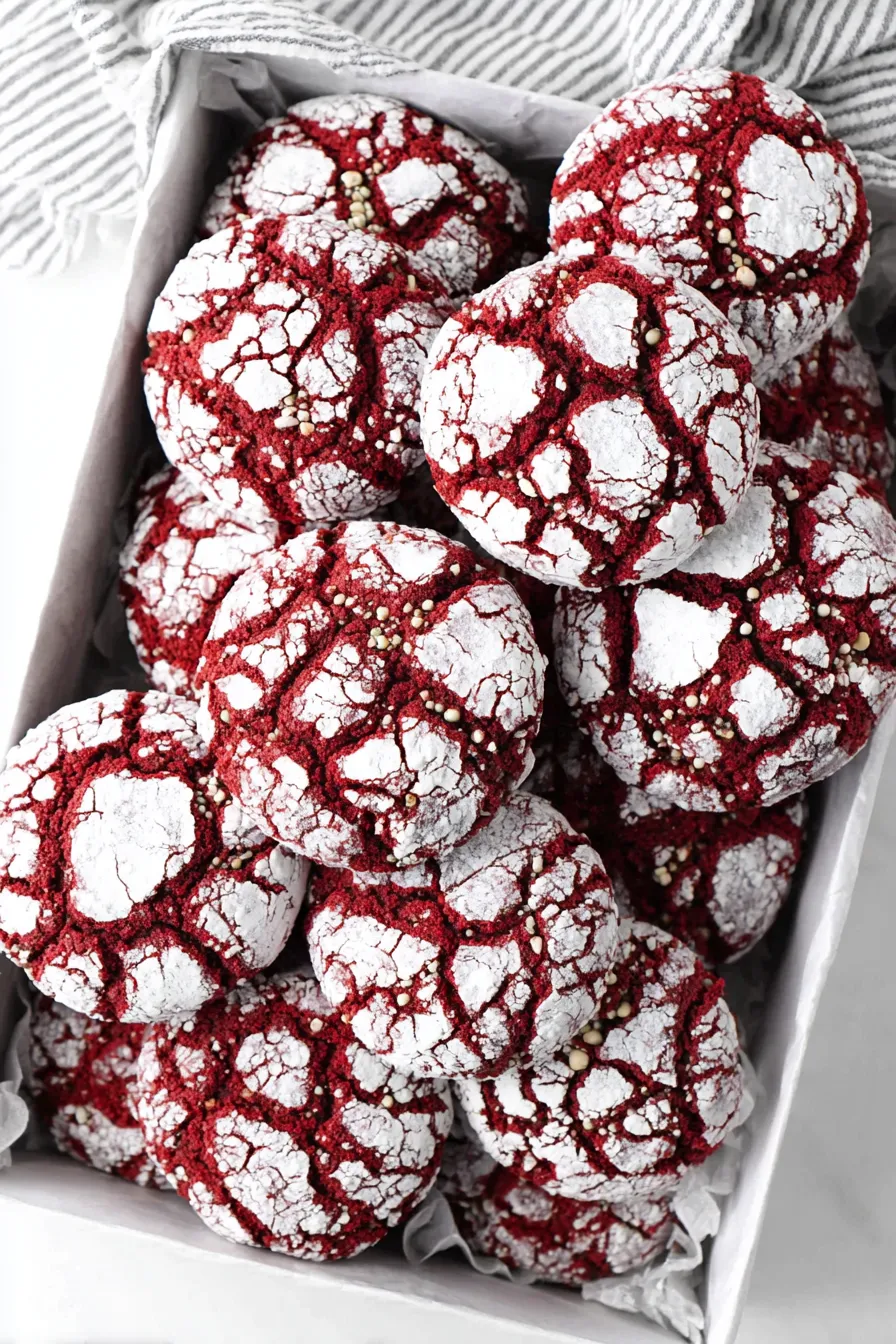
This recipe for soft baked red velvet crinkle cookies has been my go-to when I want something that feels fancy but is genuinely easy to make. I first developed it one rainy December afternoon while experimenting with a chocolate cookie base and a bold red coloring for a holiday bake. The cookies turned out pillowy, slightly chewy in the center, and beautifully cracked on top — the powdered sugar gives them that vintage crinkle look and a delicate sweetness. They remind me of gifting tins of warm cookies to neighbors and watching my niece’s face light up when she finds a white chocolate chip peeking through a snowy coating.
What makes these particularly special is the balance of flavors and textures: natural cocoa gives depth without too much bitterness, gel food coloring provides vibrant color without watering down the dough, and a touch of lemon juice brightens the chocolate. The white chocolate chips offer bursts of creamy sweetness that contrast with the cocoa, while the outer powdered sugar layer creates that signature crackle during baking. They’re soft straight from the oven and maintain a tender crumb for days when stored properly.
Why You'll Love This Recipe
- Soft, bakery-style texture that stays tender for up to three days when stored in an airtight container—no need to rush through the batch.
- Quick to assemble: active mixing and shaping take about 30 minutes; then chill for structure and bake in 12 minutes.
- Uses pantry staples—flour, cocoa, butter, and simple sugars—plus a tablespoon of gel coloring to create an impressive result.
- Make-ahead friendly: dough chills for 2 hours and can be portioned and baked later, or frozen raw for future baking.
- Kid-friendly and perfect for gifting: the white chocolate chips and crinkle finish are crowd-pleasers at parties and bake sales.
- Flexible: swap the white chocolate for semi-sweet chips or crushed nuts to suit dietary preferences and occasions.
From personal experience, this batch always disappears fast—neighbors stop by the next day asking for the recipe, and family gatherings expect a tin of these. Once I learned to chill the dough for the full two hours, the cookies spread less and develop better cracks, which looks far more professional than the rushed versions I made early on.
Ingredients
- All-purpose flour: Use standard bleached or unbleached all-purpose flour; I use King Arthur for consistent results. The flour builds the cookie’s soft structure—measure by spooning into the cup and leveling to avoid a dense cookie.
- Natural unsweetened cocoa powder: Choose a natural cocoa (not Dutch-processed) for the bright red contrast. Natural cocoa reacts with the baking soda/powder for lift and gives a light chocolate backbone without overpowering the red color.
- Baking powder & baking soda: The combination helps create a gentle rise and the crinkled top; ensure your leaveners are fresh for the best puff.
- Salt: A half teaspoon enhances chocolate flavor and balances sweetness—use fine sea salt or table salt.
- Unsalted butter: Room temperature butter (not melting) beaten with sugars traps air and yields tender crumb. I prefer European-style butter for richer flavor but standard unsalted works great.
- Granulated & light brown sugar: The mix of white and brown provides both sweetness and a touch of molasses to keep cookies soft and slightly chewy.
- Eggs: Two large eggs add structure and moisture; room temperature eggs incorporate more smoothly.
- Vanilla extract & lemon juice: Vanilla rounds the flavor; lemon juice reacts slightly with leaveners and lifts the cocoa’s brightness.
- Red gel food coloring: A tablespoon of gel color gives vivid red without adding liquid. I use AmeriColor Super Red for consistent results.
- Milk: A tablespoon and a half helps hydrate the dough and make it scoopable—use whole milk for best richness.
- White chocolate chips: Fold in for creamy pockets; choose chips labeled for baking so they hold shape.
- For rolling: Granulated sugar and powdered sugar—double coating produces the classic crackled look and a sweet exterior.
Instructions
Prepare dry ingredients: In a medium bowl, whisk together 2 cups all-purpose flour, 1/3 cup natural unsweetened cocoa powder, 1 teaspoon baking powder, 1/4 teaspoon baking soda, and 1/2 teaspoon salt until evenly combined. Breaking up any clumps in the cocoa ensures an even color and texture in the baked cookie. Cream butter and sugars: In a large mixing bowl, beat 1/2 cup room-temperature unsalted butter with 3/4 cup granulated sugar and 1/2 cup light brown sugar at medium speed until pale and creamy, about 2 minutes. Proper creaming incorporates air for lift; scrape the bowl occasionally so everything mixes evenly. Add eggs and flavorings: Add 2 large eggs one at a time, beating until combined after each addition. Mix in 1 teaspoon vanilla extract, 1 teaspoon lemon juice, and 1 tablespoon red gel food coloring until uniformly red. The lemon juice brightens the cocoa; ensure the color is fully blended for consistent appearance. Combine dry and wet: Reduce mixer speed to low and gradually add the flour-cocoa mixture, beating only until just incorporated to avoid overdeveloping gluten. Add 1 1/2 tablespoons milk and mix briefly until the dough comes together. Overmixing yields tougher cookies—stop when no dry streaks remain. Fold in chips: Gently fold in 3/4 cup white chocolate chips by hand using a spatula so they remain intact and evenly distributed. Chill the dough: Cover the dough tightly and refrigerate for 2 hours. Chilling firms the dough for neater scooping and reduces spread during baking, which enhances the crinkle effect. Preheat and prepare pans: Preheat your oven to 350°F and line two baking sheets with parchment paper. Have two shallow bowls ready—one with 1/2 cup granulated sugar and one with 1/2 cup powdered sugar for coating. Shape and coat: Using a medium cookie scoop (about 1 1/2-inch diameter) sprayed lightly with nonstick spray, portion dough into approximately 30-gram balls. Roll each ball first in granulated sugar to coat, then generously in powdered sugar so the surface is well covered; place cookies 2 inches apart on prepared sheets. Bake: Bake at 350°F for 12 minutes, rotating pans halfway through, until cookies are puffed and cracked with set edges. If you prefer slightly flatter cookies, give the baking sheets a sharp tap once or twice immediately after removing from the oven. Cool: Let cookies cool on the baking sheets for 5 minutes to finish setting, then transfer to a wire rack to cool completely. This short rest helps maintain a tender interior while letting the exterior firm just enough to hold shape.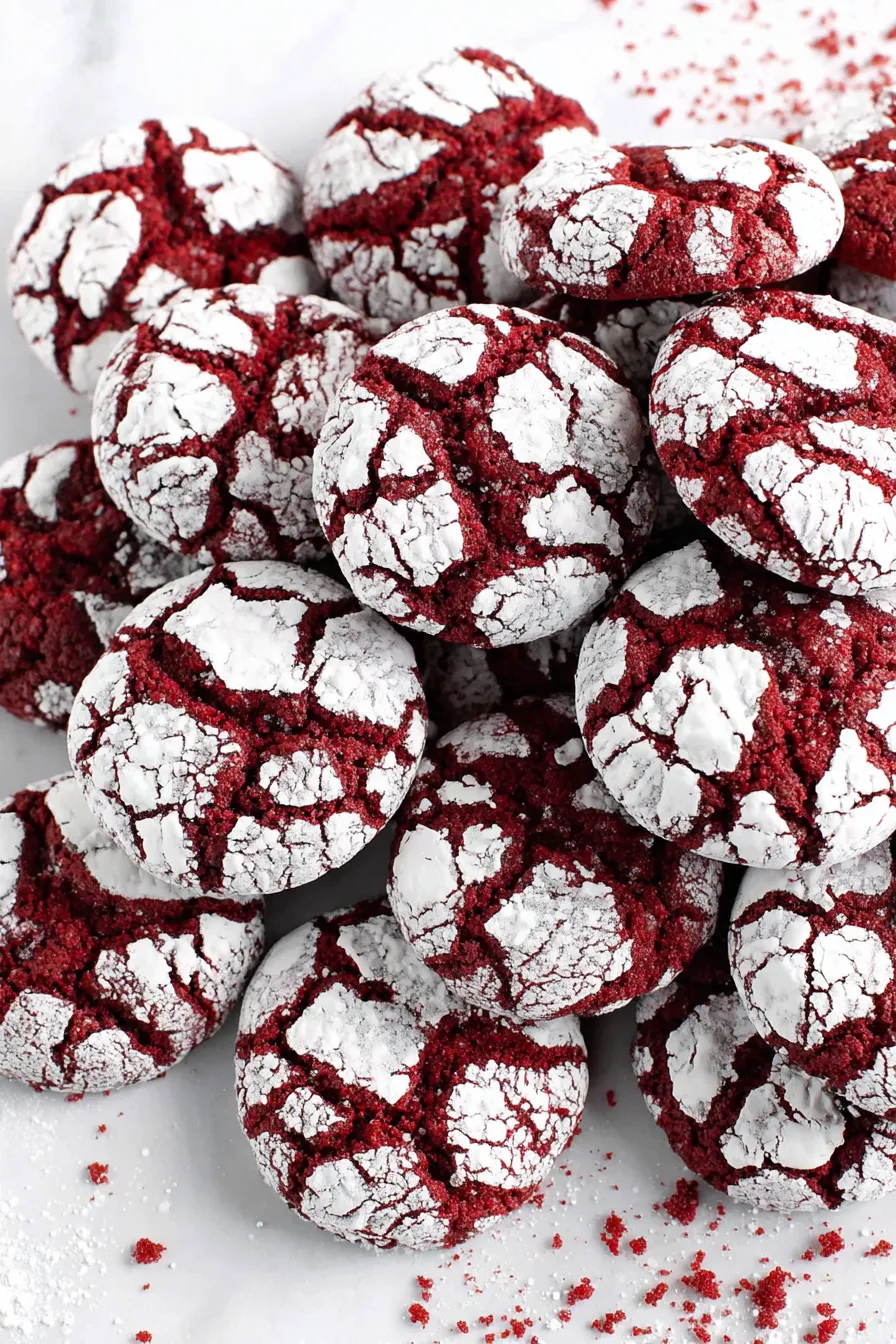
You Must Know
- These keep well at room temperature in an airtight container for up to 3 days—place a sheet of parchment between layers to avoid sticking.
- Cookies freeze beautifully: after baking, freeze in a single layer, then transfer to a zip-top bag for up to 3 months; thaw on the counter for 30–45 minutes.
- High in carbohydrates and sugar—each cookie is approximately 140 calories and ~24 g carbs, so enjoy in moderation.
- The dough can be portioned and frozen raw: scoop balls, freeze on a tray until solid, then store in a bag; bake from frozen with an extra minute or two.
- Use gel food coloring to avoid thinning the dough; liquid coloring can add unwanted moisture and affect texture.
My favorite part of these cookies is how nostalgic they feel—there’s something about powdered sugar crackles and white chocolate pockets that turns any gathering into a celebration. I’ve given jars of these away at Christmas and received notes months later asking for the recipe; it’s one of those reliable treats that people remember.
Storage Tips
Store cooled cookies in a shallow airtight container at room temperature for up to three days. If you want to maintain exterior crispness, place a piece of parchment directly on top and avoid stacking too many at once. For longer storage, freeze cooled cookies on a tray until firm, then move to a freezer-safe bag; they will keep well for about three months. To refresh slightly soft cookies, heat at 300°F for 3–4 minutes or microwave a single cookie for 8–10 seconds to regain that fresh-baked warmth.
Ingredient Substitutions
If you don’t have white chocolate chips, semi-sweet or milk chocolate chips work well; swap 1:1 but expect a more pronounced chocolate bite. To make these dairy-free, use a vegan butter substitute and dairy-free white chocolate chips—texture will be similar but flavor slightly different. For reduced color, use 2 teaspoons of gel coloring instead of a tablespoon for a darker maroon hue. Avoid liquid food coloring as it adds moisture; stick to gel for consistent structure.
Serving Suggestions
Serve warm with a glass of milk, espresso, or hot cocoa. For holiday platters, layer with sprigs of rosemary and citrus slices for a festive look. These are lovely paired with shortbread or ginger snaps on dessert boards. For gifting, wrap a dozen in parchment and tie with twine—add a small note suggesting reheating for 10 seconds in the microwave for that fresh-baked feel.
Cultural Background
The red velvet concept traces back to early 20th-century American baking, where the reaction between cocoa and acidic ingredients produced a deep reddish-brown crumb. Over time, the color became a hallmark of celebratory desserts, especially in the Southern United States. These crinkle cookies borrow the red velvet profile—cocoa and tang—while adopting the classic crinkle cookie technique that became popular in mid-century home baking.
Seasonal Adaptations
For winter holidays, add a teaspoon of cinnamon or a pinch of ground cloves to the dough for warmth. In spring, fold in chopped freeze-dried strawberries for a fruity contrast, or replace white chocolate with lemon chips for a lighter springtime flavor. For Valentine’s Day, use heart-shaped sprinkles on top of the powdered sugar coating before baking to personalize the look.
Meal Prep Tips
Make dough up to two days ahead and keep chilled; scoop portioned balls onto a tray and keep covered in the refrigerator until ready to bake. For bulk baking, freeze scooped balls on a tray, then store in bags—bake straight from frozen, adding 1–2 minutes to the bake time. Label bags with date and bake temperature so you can enjoy freshly baked cookies with minimal prep on busy days.
These red velvet crinkle cookies are a reliable favorite: easy enough for weeknight baking, impressive enough for gifting, and flexible enough for many substitutions. I encourage you to experiment with chips and coating ideas and make the recipe your own—there’s joy in sharing a batch hot from the oven or tucked into a festive box for a friend.
Pro Tips
Chill the dough for the full 2 hours to control spread and enhance the crinkle pattern.
Use a medium cookie scoop (about 1 1/2 inches) for uniform cookies and even bake times.
Roll dough generously in powdered sugar for a strong contrast and classic crackle.
This nourishing soft baked red velvet crinkle cookies recipe is sure to be a staple in your kitchen. Enjoy every moist, high protein slice — it is perfect for breakfast or as a wholesome snack any time.
Tags
Soft Baked Red Velvet Crinkle Cookies
This Soft Baked Red Velvet Crinkle Cookies recipe makes perfectly juicy, tender, and flavorful steak every time! Serve with potatoes and a side salad for an unforgettable dinner in under 30 minutes.
Ingredients
Cookies
For Rolling
Instructions
Whisk dry ingredients
In a medium bowl, whisk together flour, cocoa powder, baking powder, baking soda, and salt until evenly combined and free of lumps.
Cream butter and sugars
Beat room-temperature butter with granulated and brown sugar at medium speed until pale and creamy, about 2 minutes.
Add eggs and flavor
Add eggs one at a time, then beat in vanilla, lemon juice, and red gel food coloring until uniform.
Combine wet and dry
Reduce speed, add dry mixture gradually and mix until just combined. Add milk and mix briefly until dough comes together.
Fold in chips and chill
Fold in white chocolate chips, cover dough, and chill in the refrigerator for 2 hours to firm.
Portion and roll
Scoop 1 1/2-inch balls (~30 g each), roll in granulated sugar, then powdered sugar, and place 2 inches apart on parchment-lined sheets.
Bake and cool
Bake at 350°F for 12 minutes until puffed and cracked. Cool 5 minutes on the sheet, then transfer to a wire rack to cool completely.
Last Step: Please leave a rating and comment letting us know how you liked this recipe! This helps our business to thrive and continue providing free, high-quality recipes for you.
Nutrition
Did You Make This?
Leave a comment & rating below or tag
@delishum on social media!
Categories:
You might also like...

Gooey Marshmallow Chocolate Brownies
Thick chocolate chunk brownies crowned with melted mini marshmallows and drenched in glossy chocolate frosting for the ultimate fudgy, crowd-pleasing bite.

Buttery Pecan Pie Bars
Buttery shortbread crust meets a lush brown sugar pecan topping. Crunchy, caramelly, and ready with just 10 minutes of prep for effortless indulgence.

No-Crack Pumpkin Cheesecake
Ultra-smooth pumpkin cheesecake with warm spice and a sturdy graham crust. A showstopper on its own, unforgettable with caramel and rum-kissed whipped cream.
Did You Make This?
Leave a comment & rating below or tag @delishum on social media!
Rate This Recipe
Share This Recipe
Enjoyed this recipe? Share it with friends and family, and don't forget to leave a review!
Comments (1)
This recipe looks amazing! Can't wait to try it.
Comments are stored locally in your browser. Server comments are displayed alongside your local comments.

Hi, I'm Amelia!
What's Popular

30-Minute Meals!
Join to receive our email series which contains a round-up of some of our quick and easy family favorite recipes.