
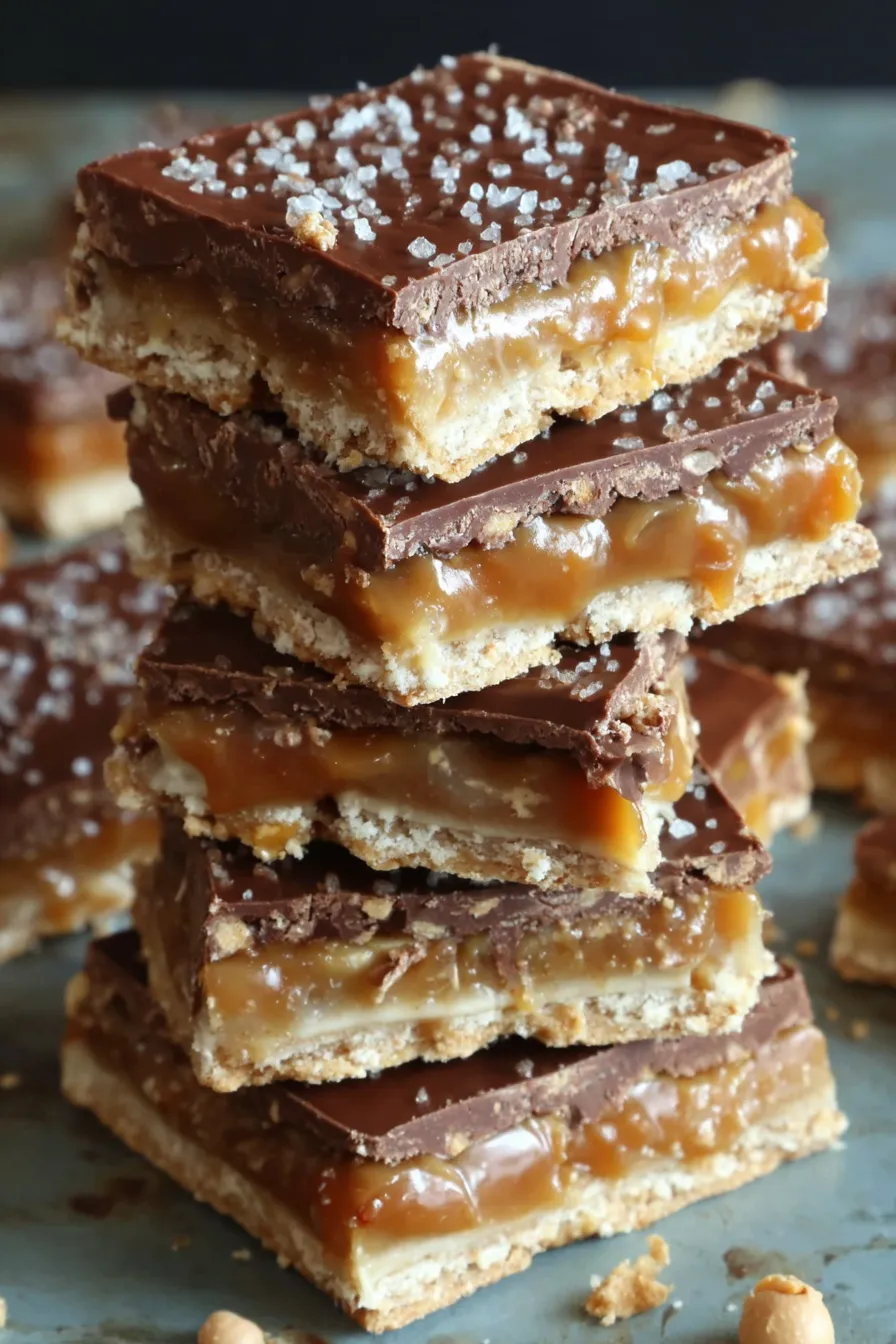
Salted Caramel Cracker Bars

Layers of crisp crackers drenched in buttery caramel and topped with a silky chocolate-butterscotch-peanut butter glaze—cut into chilled bars for a perfectly sweet-salty bite.
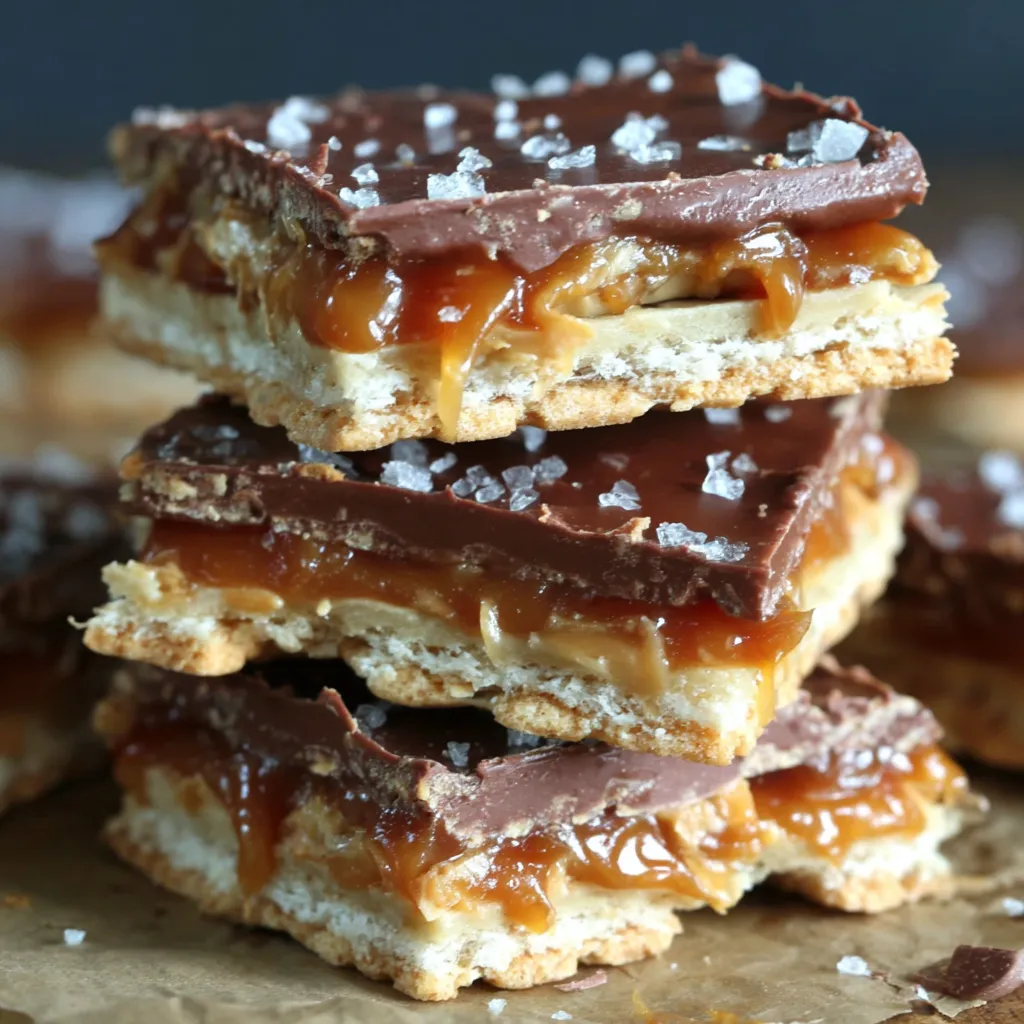
This tray of salted caramel cracker bars became my go-to sweet when I needed something both nostalgic and spectacular with very little fuss. I first stumbled on the concept at a potluck years ago: someone had stacked salted crackers and poured hot caramel over them, and the caramel seeped into the corners, creating those irresistible gooey edges. I recreated it in my kitchen, adding a chocolate-butterscotch-peanut butter topping that elevated the simple combination to something everyone remembered. These bars are textural magic—crisp, slightly salty crackers, a deeply caramelized, gooey middle, and a glossy, spready top that firms into clean slices when chilled.
I love making them for casual gatherings because they travel well and satisfy the craving for something sweet and a little grown-up. The contrast of textures—late-morning crunch that gives way to molten caramel—and the balanced sweetness mean even those who say they don’t like “super sweet desserts” end up reaching for seconds. They’re also incredibly forgiving: swap the peanut butter for almond butter, or use a different chocolate if you like. I usually make a double batch for holiday parties and freeze a pan or two for last-minute guests; thawed, they taste freshly made.
Why You'll Love This Recipe
- Little hands-on time: active prep is under 20 minutes, and the stovetop caramel cooks for just 7 minutes—ready to chill and cut within an hour if you speed-set in the freezer.
- Pantry-friendly staples: uses club or saltine crackers, brown sugar, butter, and chips you likely already keep on hand.
- Make-ahead friendly: refrigerates or freezes beautifully for quick entertaining—store in the fridge for a week or freeze up to 3 months.
- Balanced sweet-salty profile: salted crackers cut through the richness, and the butterscotch-chocolate-peanut butter topping gives a layered flavor experience.
- Customizable: easily swapped chips, nut butters, or added flaky salt on top for a more dramatic finish.
From my first attempt to the version I make now, I’ve learned a few tricks: keep stirring the caramel to avoid scorching, pour the caramel while still hot for the best seepage, and always use room-temperature butter so the caramel sets at the right consistency. Family and friends always ask for the recipe—and more importantly, for another pan.
Ingredients
- Club crackers: Use 72–80 salted club crackers to fit a 9x13-inch pan (about 6 sleeves depending on brand). Look for consistent, rectangular crackers that will line up neatly—Keebler Club or generic salted club crackers work well.
- Butter: 1 cup (2 sticks) unsalted or salted butter, melted. Unsalted gives you precise control over salt, but salted is fine if that's what you have—just taste before adding extra salt.
- Graham cracker crumbs: 2 cups finely crushed graham crackers. These add body to the caramel and deepen the toffee-like flavor; measure by packing into a measuring cup.
- Packed brown sugar: 2 cups. I prefer dark brown sugar for a richer molasses note, which brightens the caramel flavor. Pack firmly when measuring.
- Milk: 2/3 cup whole milk. Whole milk gives silkiness; you can use 2% in a pinch but the sauce will be slightly less rich.
- Vanilla: 2 teaspoons pure vanilla extract for aroma and to round the caramel.
- Milk chocolate chips: 1 cup. Use semi-sweet if you prefer less sweetness—either melts well and pairs with butterscotch.
- Butterscotch chips: 1 cup. These add deep caramel notes and help the top set glossy.
- Peanut butter: 1/3 cup creamy peanut butter. Natural brands are fine; if very oily, stir well before measuring. Swap for almond or cashew butter if needed.
Instructions
Prepare the pan and crackers: Line a 9x13-inch baking pan with parchment paper or foil, leaving an overhang for easy lifting. Arrange a single layer of crackers in the pan, touching edge to edge; you may need to break a few to fit. Count roughly 36–40 crackers per layer depending on brand; for a 10x15-inch jelly roll pan you will need more crackers and the bars will be thinner. Make the caramel base: In a medium saucepan over medium heat, combine 1 cup melted butter, 2 cups packed brown sugar, 2 cups crushed graham crackers, and 2/3 cup milk. Bring the mixture to a steady boil, stirring constantly to prevent scorching. Once boiling, reduce heat only enough to maintain a gentle, rolling boil and continue to boil for 7 minutes, stirring continuously—this develops the caramel and prevents graininess. Remove from heat and stir in 2 teaspoons vanilla. Assemble layers: Carefully pour half of the hot caramel over the first cracker layer, using a spatula to nudge caramel into gaps. Add a second layer of crackers, pressing lightly but not crushing, then pour the remaining caramel evenly over this layer. Top with a final layer of crackers so the top is covered—this seals the caramel between layers and gives a neat finish. Prepare the glaze: In a small saucepan over low to medium-low heat, combine 1 cup milk chocolate chips, 1 cup butterscotch chips, and 1/3 cup peanut butter. Stir constantly until the mixture is completely melted and smooth—aim for a glossy texture. Remove from heat and let the glaze cool for a minute so it’s pourable but not scorching. Finish and chill: Pour the warm glaze over the top cracker layer, spreading gently with an offset spatula to coat evenly. For quickest set-up, place the pan in the freezer until firm (about 20–30 minutes). Otherwise, refrigerate for 1–2 hours until completely set. Use the parchment overhang to lift the block from the pan and cut into bars with a sharp knife, wiping the blade between cuts for clean edges.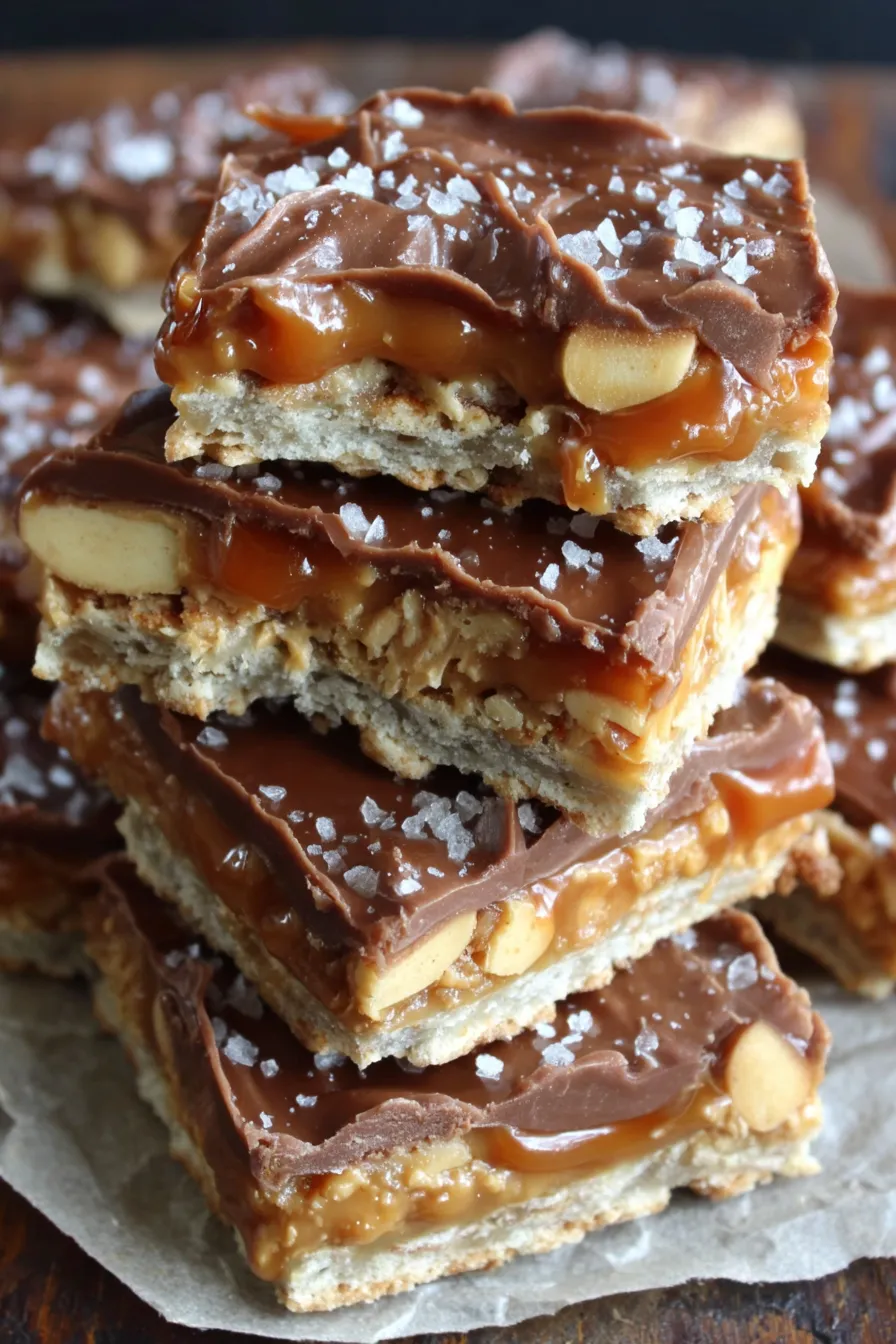
You Must Know
- These bars are not shelf-stable; keep refrigerated and they will stay good for up to 7 days. Freeze for up to 3 months—thaw in the fridge before serving.
- The 7-minute boil is essential for the right set and flavor—shortening that step produces a softer, less caramelized filling.
- Because crackers are salted, the finished bar has a balanced sweet-salty profile; taste the caramel and glaze before adding any extra salt.
- This treats a crowd: a 9x13-inch pan yields roughly 36 medium bars; cut smaller for more servings.
My favorite moment with these bars is watching the caramel creep from the edges as the pan cools—kids press their fingers to the foil to get a sticky edge piece, and grown-ups argue about whether to warm a slice briefly before serving (I say mostly no; chilled is best for clean slices). These have accompanied summer picnics, school bake sales, and late-night coffee runs.
Storage Tips
Store bars in an airtight container in the refrigerator for up to 7 days to maintain a firm top and prevent the crackers from becoming overly soft. If stacking in the container, place wax paper or parchment between layers to avoid sticking. For longer storage, wrap the cut bars individually in plastic wrap and place in a freezer-safe bag; freeze for up to 3 months. Thaw overnight in the refrigerator before serving. Reheat briefly (10–12 seconds) in the microwave if you prefer a slightly softer center—watch closely so the chocolate top doesn't melt too much.
Ingredient Substitutions
If you need to adjust ingredients, most substitutions work well: swap peanut butter for almond or cashew butter for a different nut flavor, or use vegan butter and dairy-free chips to make them dairy-free (note: texture and flavor will shift). For a lower-sugar version, use dark brown sugar and semi-sweet chips—expect a less overtly sweet finish but still delicious. If graham crackers are unavailable, use digestive biscuits, and for a gluten-free version choose certified gluten-free crackers and crumbs. Keep ratios the same and remember the 7-minute boil is where texture is created.
Serving Suggestions
Serve chilled for clean slices and a satisfying snap; garnish each bar with a light sprinkle of flaky sea salt just before serving for a professional touch. Pair with strong coffee or a fruity sparkling wine to cut through the richness. For a dessert plate, add a small scoop of vanilla ice cream and a drizzle of caramel sauce. These bars also work as a handheld dessert at parties—cut into bite-sized squares for a tray of little treats that guests can pop into their mouths.
Cultural Background
The idea of layering crackers or cookies with a boiled caramel topping has roots in classic American “pan” confections and mid-century tray desserts. Variations like cracker toffee or “saltine toffee” became popular because they were affordable, used pantry staples, and delivered complex flavors—salt, butter, and caramel—without elaborate baking. My version leans on that tradition and modernizes it with a glossy dual-chip glaze and nut butter for a nod to contemporary flavor pairings.
Seasonal Adaptations
For autumn, swap peanut butter for pumpkin seed butter and add a pinch of cinnamon to the caramel. In winter, fold a bit of peppermint extract into the glaze and sprinkle crushed candy cane on top. Summer calls for lighter toppings—try white chocolate and a scattering of toasted coconut. For holiday gifting, press festive sprinkles into the glaze before it sets and wrap individual bars in cellophane tied with ribbon.
Meal Prep Tips
Make the bars ahead by preparing the entire pan and freezing before cutting—this way you can slice partially frozen for clean edges and bag individual portions for lunches or snacks. If using for a dessert buffet, thaw in the fridge the day before and finish with flaky salt just before placing on the table. Keep a bench scraper and a sharp knife on hand for neat cutting; wipe the blade between cuts to avoid drag and smearing of the glaze.
These salted caramel cracker bars are one of those treats that bring people into the kitchen—simple to make, elegant to present, and endlessly adaptable. Make a pan, share it, and tweak the flavors until it becomes your signature sweet.
Pro Tips
Boil the caramel for the full 7 minutes, stirring constantly, to achieve proper caramelization and prevent a grainy texture.
Use parchment or foil with an overhang to lift the whole slab from the pan for easy, clean slicing.
Chill the pan in the freezer for 20–30 minutes to speed up setting and get neat slices with minimal sticking.
If the glaze seems too thick, warm it very briefly and stir to reach a pourable consistency; do not overheat.
This nourishing salted caramel cracker bars recipe is sure to be a staple in your kitchen. Enjoy every moist, high protein slice — it is perfect for breakfast or as a wholesome snack any time.
Tags
Salted Caramel Cracker Bars
This Salted Caramel Cracker Bars recipe makes perfectly juicy, tender, and flavorful steak every time! Serve with potatoes and a side salad for an unforgettable dinner in under 30 minutes.
Ingredients
Bars
Frosting/Glaze
Instructions
Line pan and arrange crackers
Line a 9x13-inch pan with parchment or foil, leaving an overhang. Place one layer of crackers touching edge to edge to cover as much of the pan as possible; break crackers to fit.
Make the caramel
In a medium saucepan, combine 1 cup melted butter, 2 cups packed brown sugar, 2 cups crushed graham crackers, and 2/3 cup milk. Bring to a boil over medium heat, stirring constantly. Once boiling, maintain a rolling boil and cook for 7 minutes while stirring to prevent burning and ensure smooth caramelization. Remove from heat and stir in 2 teaspoons vanilla.
Assemble layers with caramel
Pour half the hot caramel over the first cracker layer, spreading gently. Add a second layer of crackers, pour the remaining caramel, and top with a final cracker layer to seal the caramel.
Make the glaze
Over low heat, melt 1 cup milk chocolate chips, 1 cup butterscotch chips, and 1/3 cup peanut butter, stirring until smooth and glossy. Remove from heat and let cool a minute to a pourable temperature.
Finish, chill, and cut
Pour the glaze over the top layer and spread evenly. Chill in the freezer for 20–30 minutes or refrigerate 1–2 hours until firm. Lift the block using the parchment overhang and cut into bars with a sharp knife, wiping the blade between cuts for neat slices.
Last Step: Please leave a rating and comment letting us know how you liked this recipe! This helps our business to thrive and continue providing free, high-quality recipes for you.
Nutrition
Did You Make This?
Leave a comment & rating below or tag
@delishum on social media!
Categories:
You might also like...

Gooey Marshmallow Chocolate Brownies
Thick chocolate chunk brownies crowned with melted mini marshmallows and drenched in glossy chocolate frosting for the ultimate fudgy, crowd-pleasing bite.

Buttery Pecan Pie Bars
Buttery shortbread crust meets a lush brown sugar pecan topping. Crunchy, caramelly, and ready with just 10 minutes of prep for effortless indulgence.

No-Crack Pumpkin Cheesecake
Ultra-smooth pumpkin cheesecake with warm spice and a sturdy graham crust. A showstopper on its own, unforgettable with caramel and rum-kissed whipped cream.
Did You Make This?
Leave a comment & rating below or tag @delishum on social media!
Rate This Recipe
Share This Recipe
Enjoyed this recipe? Share it with friends and family, and don't forget to leave a review!
Comments (1)
This recipe looks amazing! Can't wait to try it.
Comments are stored locally in your browser. Server comments are displayed alongside your local comments.

Hi, I'm Amelia!
What's Popular

30-Minute Meals!
Join to receive our email series which contains a round-up of some of our quick and easy family favorite recipes.