
Mini Apple Hand Pies

Crisp, buttery mini apple hand pies filled with tender cinnamon-scented apples and topped with crunchy cinnamon sugar—perfect for brunch, parties, or a cozy snack.
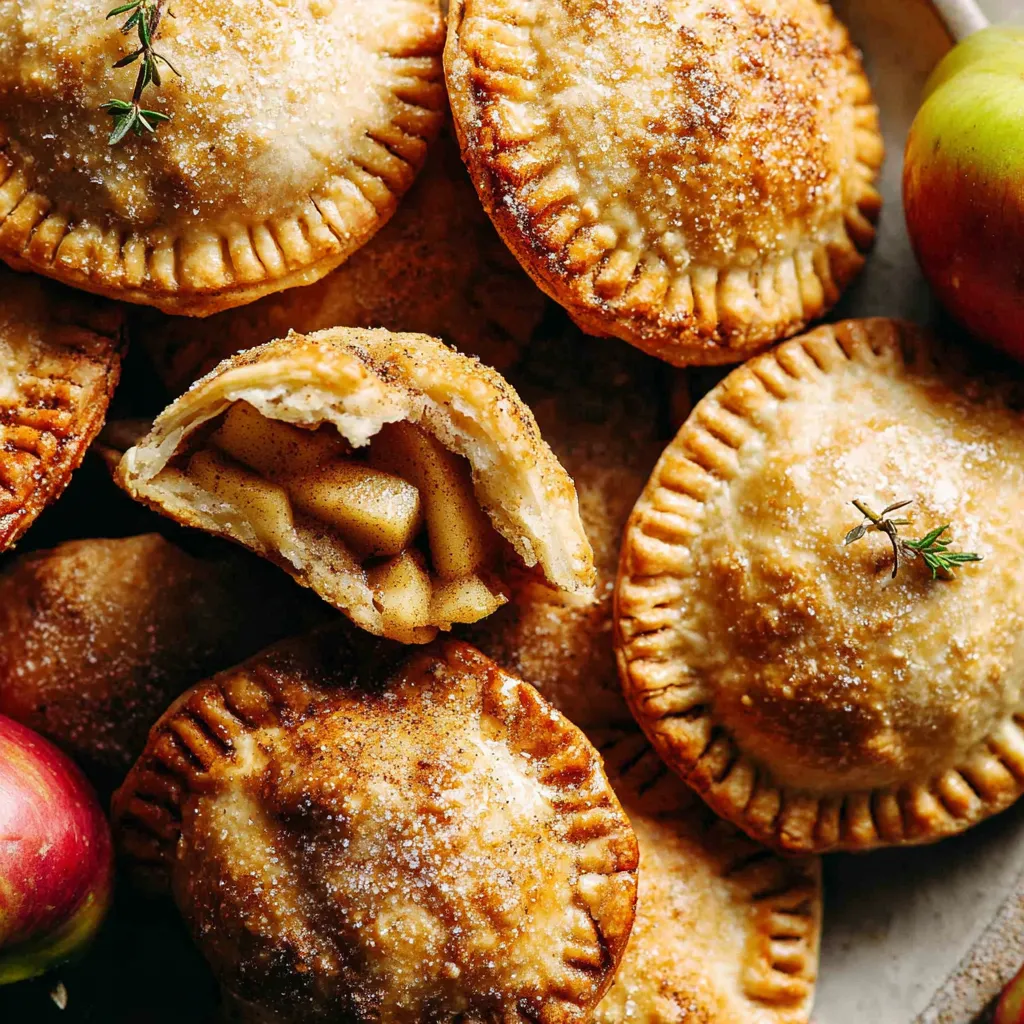
This recipe is one of those little discoveries that immediately became a favorite in my kitchen. I first made these mini apple hand pies on an overcast Sunday afternoon when I wanted something to warm the house and lift spirits. The idea was simple: take all the comforting flavors of an apple pie, shrink them down, and make them easy to eat by hand. The result is a golden, flaky pocket filled with tender, lemon-bright apples and a kiss of cinnamon—crispy on the outside, soft and syrupy on the inside. They travel well, disappear fast at potlucks, and feel special enough for a holiday yet casual enough for a weekday treat.
I learned a few tricks early on—cook the filling until the apples are just tender, use a small amount of cornstarch to bind the juices, and chill the cut dough shapes before filling to keep the edges clean. What I love most is how adaptable they are: swap apples for pears, add chopped nuts, or switch to a plant-based butter without losing any of the charm. These pockets always draw a crowd; my niece calls them tiny apple presents, and she judges every batch with the seriousness of a seasoned baker.
Why You'll Love This Recipe
- Handheld and portable—perfect for brunch, lunchboxes, or impromptu guests; each mini pie is a single-serve delight that takes the fuss out of slicing and serving.
- Quick to assemble with store-bought dough and pantry staples: ready in about 35 minutes active time and a short bake, so you can make a batch after work.
- Uses everyday apples like Fuji or Honeycrisp for consistent sweetness and texture; finely chopping the fruit helps them cook evenly and stay soft without falling apart.
- Make-ahead friendly—fill and freeze unbaked for up to one month, or bake ahead and reheat; they retain flakiness with simple reheating on a sheet pan.
- Customizable: swap brown sugar for maple syrup, add raisins or chopped walnuts, or use a gluten-free dough for dietary needs while keeping the signature flavor.
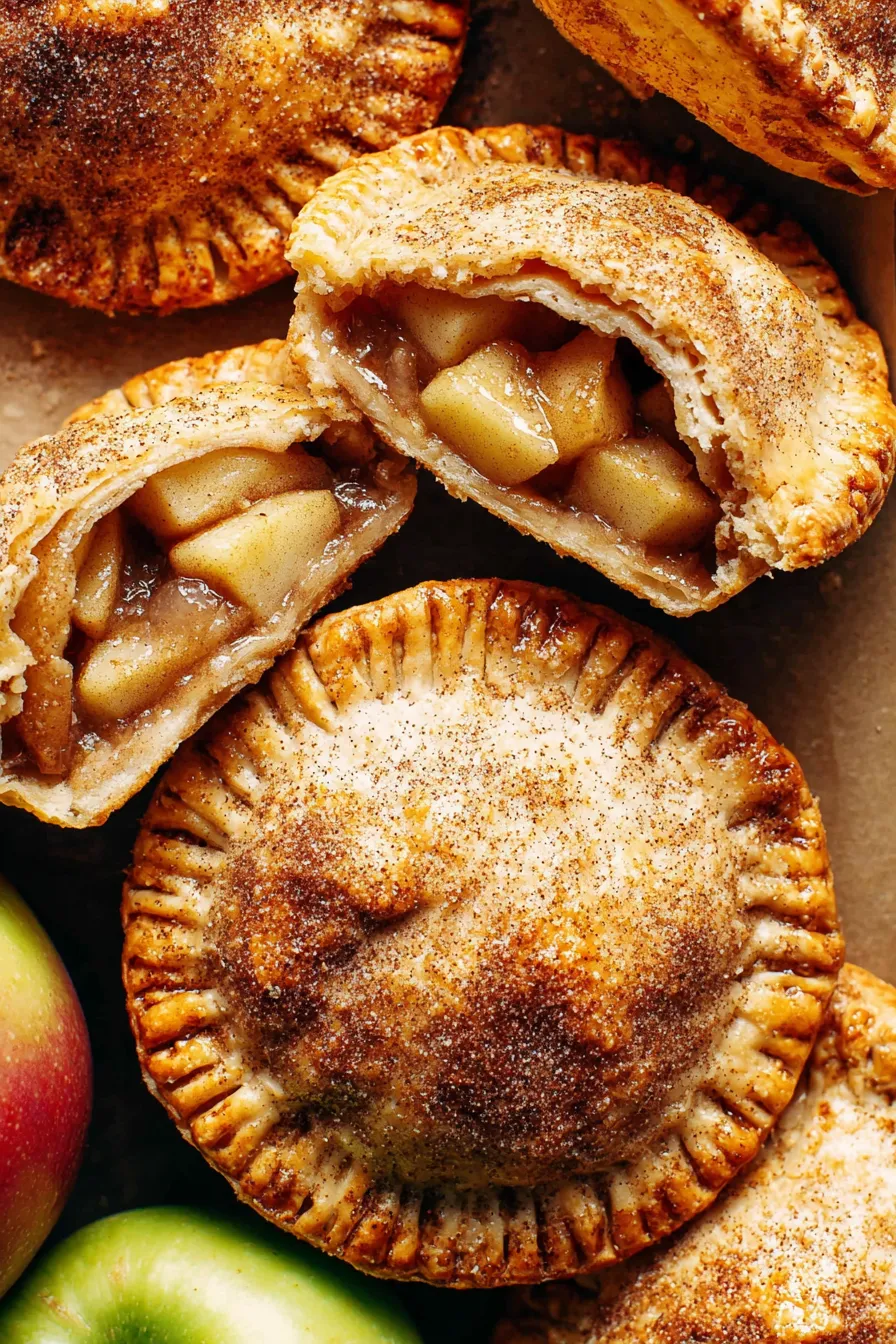
On my first test batch, I brought these to a family picnic and watched neighbors trade bites and recipes. The crisp cinnamon-sugar finish is always the first thing someone praises; it melts into the hot crust during baking and then gives a delightful crunch. I keep a box of dough in the freezer now, just so I can make these whenever the mood for warm apples hits.
Ingredients
- Pie dough: One box of store-bought pie dough (contains two 9-inch sheets). Look for a high-fat dough like Pillsbury or a bakery-style refrigerated sheet for best flake and lift; for gluten-free, use a labeled GF pie dough sheet.
- Butter: 2 tablespoons unsalted butter or plant-based spread. Butter browns slightly in the pan and adds flavor and richness; if using plant-based, choose one formulated for baking.
- Apples: 2 1/2 cups finely chopped Fuji or Honeycrisp (about 2 large apples). These varieties hold shape and have a bright sweetness; peel if you prefer a smoother texture.
- Brown sugar: 1/4 cup packed light brown sugar. Provides a molasses note and soft caramelization; dark brown will be richer but slightly heavier.
- Cinnamon: 1 teaspoon ground cinnamon for the filling and an extra 1 teaspoon for the topping. Freshly ground cinnamon delivers the best aroma.
- Lemon: Juice of 1/2 lemon. The acid keeps the apples bright and balances the sweetness so the filling doesn’t taste flat.
- Cornstarch: 1/2 teaspoon cornstarch mixed with 1 tablespoon water. This slurry thickens the cooking juices quickly without making the filling gummy.
- Egg wash & topping: 1 large egg beaten with 2 teaspoons water, plus 1/2 cup granulated sugar blended with 1 teaspoon cinnamon to finish. The egg wash seals and gives color; the cinnamon sugar adds crunch and shine.
Instructions
Bring the dough to room temperature: Remove the pie dough from the refrigerator and let both sheets sit on the counter while you make the filling so they relax and are easy to roll. This prevents tearing when you cut shapes. Make the filling: In a medium saucepan over medium heat, melt 2 tablespoons of butter. Add the finely chopped apples, 1/4 cup packed light brown sugar, 1 teaspoon ground cinnamon, and the juice from half a lemon. Cook for about 8–10 minutes, stirring occasionally, until the apples are tender and releasing their juices but not mushy. Thicken: Combine 1/2 teaspoon cornstarch with 1 tablespoon cold water to make a slurry. Stir it into the saucepan and heat for 20–30 seconds until the filling thickens and glossy juices cling to the apple pieces. Remove from heat and cool completely—warm filling will make the dough soggy. Preheat and prep: Heat the oven to 400°F. Line a large baking sheet with parchment paper. Lightly flour your work surface and unroll one dough sheet; roll gently to smooth any creases without stretching the dough. Cut shapes: Use an apple-shaped cookie cutter or a cardboard template to cut about eight shapes from each sheet (roll scraps once). Transfer cut shapes to the refrigerator to firm for 5–10 minutes—cold dough seals better. Assemble: Arrange half the cut pieces on the baking sheet. Place about 1 tablespoon of cooled filling in the center of each, leaving a 1/4-inch border. Brush the border with egg wash. Cut four small slits in the matching tops to vent steam, then place them over the filled bottoms, press seams, crimp with a fork, and brush the surface with egg wash. Finish and bake: Mix 1/2 cup granulated sugar with 1 teaspoon cinnamon and sprinkle about 1 teaspoon onto each pie. Bake at 400°F for 12–14 minutes, until golden brown. Let cool on the sheet for 5 minutes before transferring to a rack to finish cooling.
You Must Know
- These pockets freeze well either before baking (freeze on a tray then bag) or after baking; unbaked frozen pies last up to one month, baked ones up to two weeks refrigerated.
- Each mini pie is single-serve and about 180–220 calories depending on dough and butter choices; they’re a moderate treat with balanced sweetness.
- To avoid soggy bottoms, make sure the filling is cool and the dough remains cold; chilling cut shapes before filling is a simple but essential step.
- If making two batches, keep unused cut shapes refrigerated and preheat the oven again for the second tray so both batches get the same oven spring and color.
I love the small rituals around making these: the scent of butter and cinnamon in the pan, the satisfying press of a fork crimping the edge, and the shared smiles when someone bites into a warm pocket. They’ve been my fallback for gatherings because they’re easy to transport and always seem to disappear faster than larger desserts.
Storage Tips
Store cooled pies in an airtight container at room temperature for up to 24 hours, or refrigerate up to 3 days. For longer storage, arrange unbaked pies on a tray and freeze until solid, then transfer to a freezer-safe bag for up to one month; bake from frozen adding 4–6 minutes to the time. Reheat baked pies on a sheet pan at 325°F for 6–8 minutes to revive crispness. Avoid microwaving if you want a flaky crust—microwaving makes them soggy.
Ingredient Substitutions
Swap plant-based butter for dairy butter to keep it dairy-free; choose a block-style margarine that’s made for baking for the best texture. For a lower-sugar version, reduce the brown sugar by a tablespoon or replace part of it with erythritol or a similar baking-friendly sweetener—expect a slightly less caramelized flavor. Use pears or quince in place of apples for a seasonal twist; reduce cook time slightly for softer fruits. For gluten-free, use a ready-made GF pie crust sheet and handle gently when rolling.
Serving Suggestions
Serve warm from the oven with a scoop of vanilla ice cream or a dollop of lightly sweetened ricotta. For brunch, pair with a sharp cheddar and a green apple salad to echo the fruit theme. Garnish with a light dusting of confectioners’ sugar or a drizzle of salted caramel for a richer presentation. These are ideal finger foods for parties—place them on a rustic board with small bowls of lemon curd and whipped cream for variety.
Cultural Background
Hand pies have roots in many culinary traditions as a portable way to enjoy a filled pastry—think empanadas, Cornish pasties, and French chaussons. In the American baking vernacular, the apple-filled pocket is a direct nod to classic apple pie, scaled down to single servings. Using store-bought dough modernizes the process while still celebrating the time-honored pairing of baked fruit with buttery pastry that’s been comforting families for generations.
Seasonal Adaptations
Autumn calls for spiced apples and a touch of nutmeg; add a pinch to the filling and swap brown sugar for maple syrup for an autumnal profile. In summer, use baked peaches with a squeeze of lime and a tablespoon of cornflour to thicken the juices. For holiday parties, fold in chopped crystallized ginger and orange zest for brightness, or add toasted pecans for crunch. Small adjustments transform these into a year-round favorite.
Meal Prep Tips
For efficient batch cooking, prepare the filling ahead and refrigerate for up to 3 days. Cut dough shapes and stack between parchment sheets to prevent sticking. Freeze assembled unbaked pies flat, then label and store; when ready to bake, place frozen pies on a preheated sheet and allow a few extra minutes in the oven. Portion into bakery boxes for grab-and-go breakfasts or pack in insulated containers for picnics.
These mini apple hand pies are one of those small pleasures that make hosting simple and everyday baking feel celebratory. I encourage you to make a double batch and share them—friends and family will thank you.
Pro Tips
Chill cut dough shapes for 5–10 minutes before filling to prevent leaking and to get cleaner seams.
Cool the filling completely before assembling to avoid soggy bottoms and ensure the cornstarch sets.
If you don’t have an apple cutter, create a cardboard template to trace and cut uniform shapes.
To re-crisp after refrigeration, warm pies in a 325°F oven for 6–8 minutes instead of microwaving.
This nourishing mini apple hand pies recipe is sure to be a staple in your kitchen. Enjoy every moist, high protein slice — it is perfect for breakfast or as a wholesome snack any time.
Tags
Mini Apple Hand Pies
This Mini Apple Hand Pies recipe makes perfectly juicy, tender, and flavorful steak every time! Serve with potatoes and a side salad for an unforgettable dinner in under 30 minutes.
Ingredients
Dough
Filling
Topping & Egg Wash
Instructions
Bring dough to room temperature
Remove pie dough from the refrigerator and let both sheets sit on the counter while you prepare the filling so the dough relaxes and is easier to roll and cut.
Cook the apple filling
In a medium saucepan over medium heat, melt 2 tablespoons butter. Add finely chopped apples, 1/4 cup light brown sugar, 1 teaspoon cinnamon, and juice of 1/2 lemon. Cook, stirring occasionally, until apples are tender and juices are released, about 8–10 minutes.
Thicken and cool
Mix 1/2 teaspoon cornstarch with 1 tablespoon cold water and stir into the apples. Heat for 20–30 seconds until thickened, then remove from heat and cool completely to avoid soggy pastry.
Preheat and roll
Preheat oven to 400°F and line a baking sheet with parchment. Lightly flour your surface and gently roll one dough sheet to remove creases without stretching the dough.
Cut shapes and chill
Use an apple-shaped cutter or template to cut about eight shapes per sheet. Place cut shapes on a tray and refrigerate for 5–10 minutes to firm the dough.
Assemble pies
Place half the cut shapes on the sheet, spoon 1 tablespoon of cooled filling onto each leaving a small border, brush edges with egg wash, place vented tops on, press and crimp edges with a fork, and brush tops with egg wash.
Add topping and bake
Mix 1/2 cup granulated sugar with 1 teaspoon cinnamon and sprinkle about 1 teaspoon onto each pie. Bake at 400°F for 12–14 minutes until golden brown. Cool on the sheet 5 minutes, then transfer to a rack.
Last Step: Please leave a rating and comment letting us know how you liked this recipe! This helps our business to thrive and continue providing free, high-quality recipes for you.
Nutrition
Did You Make This?
Leave a comment & rating below or tag
@delishum on social media!
Categories:
You might also like...

Gooey Marshmallow Chocolate Brownies
Thick chocolate chunk brownies crowned with melted mini marshmallows and drenched in glossy chocolate frosting for the ultimate fudgy, crowd-pleasing bite.

Buttery Pecan Pie Bars
Buttery shortbread crust meets a lush brown sugar pecan topping. Crunchy, caramelly, and ready with just 10 minutes of prep for effortless indulgence.

No-Crack Pumpkin Cheesecake
Ultra-smooth pumpkin cheesecake with warm spice and a sturdy graham crust. A showstopper on its own, unforgettable with caramel and rum-kissed whipped cream.
Did You Make This?
Leave a comment & rating below or tag @delishum on social media!
Rate This Recipe
Share This Recipe
Enjoyed this recipe? Share it with friends and family, and don't forget to leave a review!
Comments (1)
This recipe looks amazing! Can't wait to try it.
Comments are stored locally in your browser. Server comments are displayed alongside your local comments.

Hi, I'm Amelia!
What's Popular

30-Minute Meals!
Join to receive our email series which contains a round-up of some of our quick and easy family favorite recipes.