
Funfetti Icebox Cake

A playful, no-bake layer cake made with shortbread cookies, cloud-like whipped cream and a rainbow of sprinkles — perfect for easy parties and weeknight celebrations.
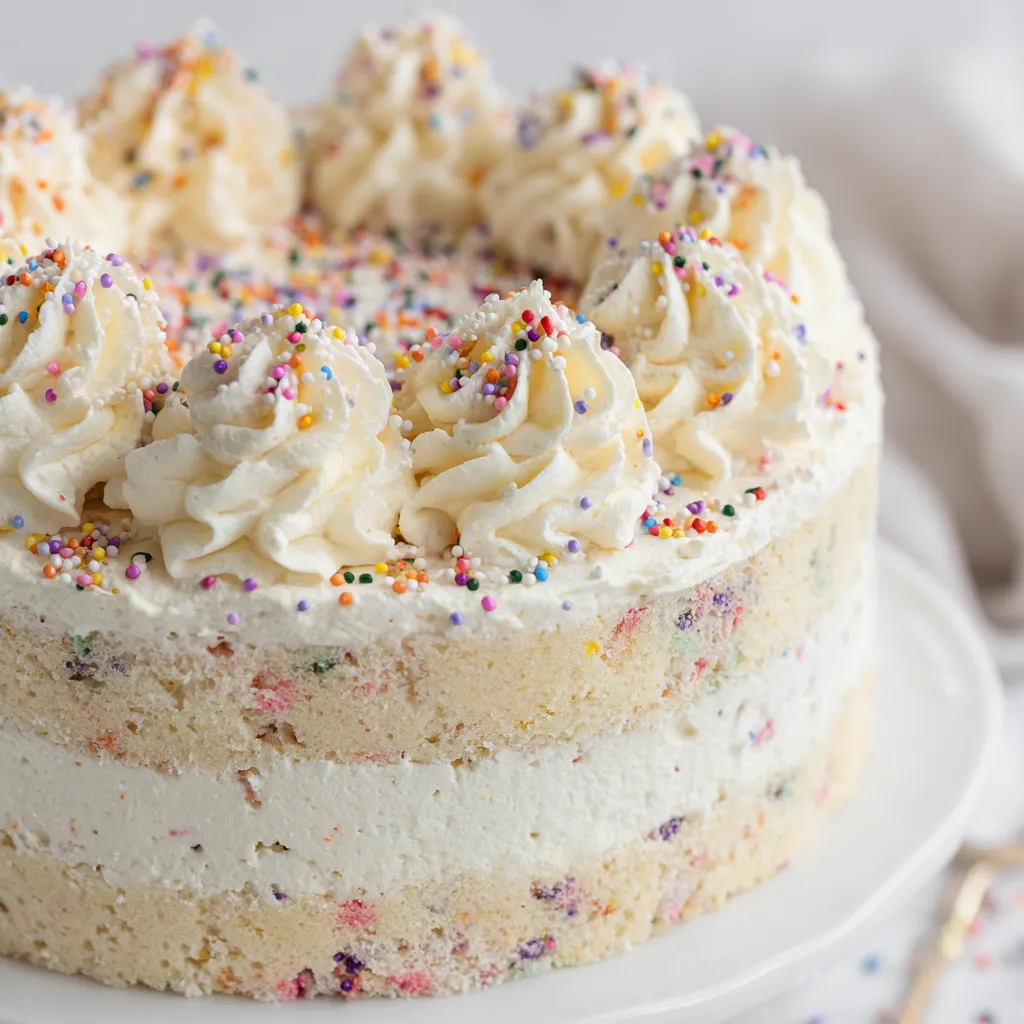
This Funfetti Icebox Cake has been my go-to celebration dessert ever since I first made it for a surprise birthday brunch. I wanted something that felt festive, tasted like a party, and required no oven time so I could focus on plating and company. The result was a tall, pillowy stack of whipped cream and crisp shortbread that softened just enough in the fridge to become sliceable but kept a gentle textural contrast. Family and friends loved how it looked on the table; the sprinkles on top always prompt a few delighted gasps before the first forkful.
I discovered this assembly method during a summer when my oven was out of commission and I needed a showstopper that would travel easily. Once the cookies and cream get to know each other in the refrigerator for a few hours, they meld into something like a light, creamy torte with subtle buttery crunch. It’s simple, forgiving, and perfect for both last-minute celebrations and planned gatherings. The final cake is sweet but not cloying, with the vanilla-scented whipped cream balancing the sugar in the cookies and sprinkles.
Why You'll Love This Recipe
- Quick assembly that takes about 15 minutes of active time so you can prepare a memorable dessert without fuss.
- Uses pantry and store-bought staples: shortbread cookies, heavy cream, powdered sugar and sprinkles — no baking required.
- Make-ahead friendly — refrigerate for at least 4 hours or overnight; it only gets better the next day.
- Crowd-pleasing presentation: slices hold together well and the colorful topping adds instant celebration energy.
- Flexible for dietary tweaks: switch cookie types or use stabilized cream for longer shelf life.
- Perfect for parties, picnics and potlucks because it travels chilled and slices neatly when cold.
When I first served this at a backyard party the kids dove in for seconds and my most skeptical aunt asked for the recipe. It’s one of those dishes that feels both nostalgic and modern — like a grown-up icebox cake that still remembers its birthday-cake roots. Over time I’ve learned a few tricks that make assembly faster and the texture more reliable, which I share below so your result is the best possible.
Ingredients
- Shortbread cookies: Use about 10.5 ounces of sturdy shortbread (roughly 12 standard cookies). Look for plain, buttery shortbread such as Walkers or store-brand tea biscuits that will soften but not disintegrate under cream.
- Heavy cream: 1 2/3 cups heavy cream (about 13.3 fluid ounces). Choose a cream labeled heavy whipping cream with at least 36 percent fat so it whips up stiff and stable.
- Powdered sugar: 1/3 cup confectioners sugar (sifted if lumpy) to sweeten and stabilize the cream without grit.
- Vanilla extract: 1 teaspoon pure vanilla. Avoid imitation for the cleanest flavor; pure vanilla elevates the creaminess.
- Rainbow sprinkles: 1/3 cup nonpareil sprinkles for the classic funfetti look. Use small round sprinkles for the most even color distribution.
Instructions
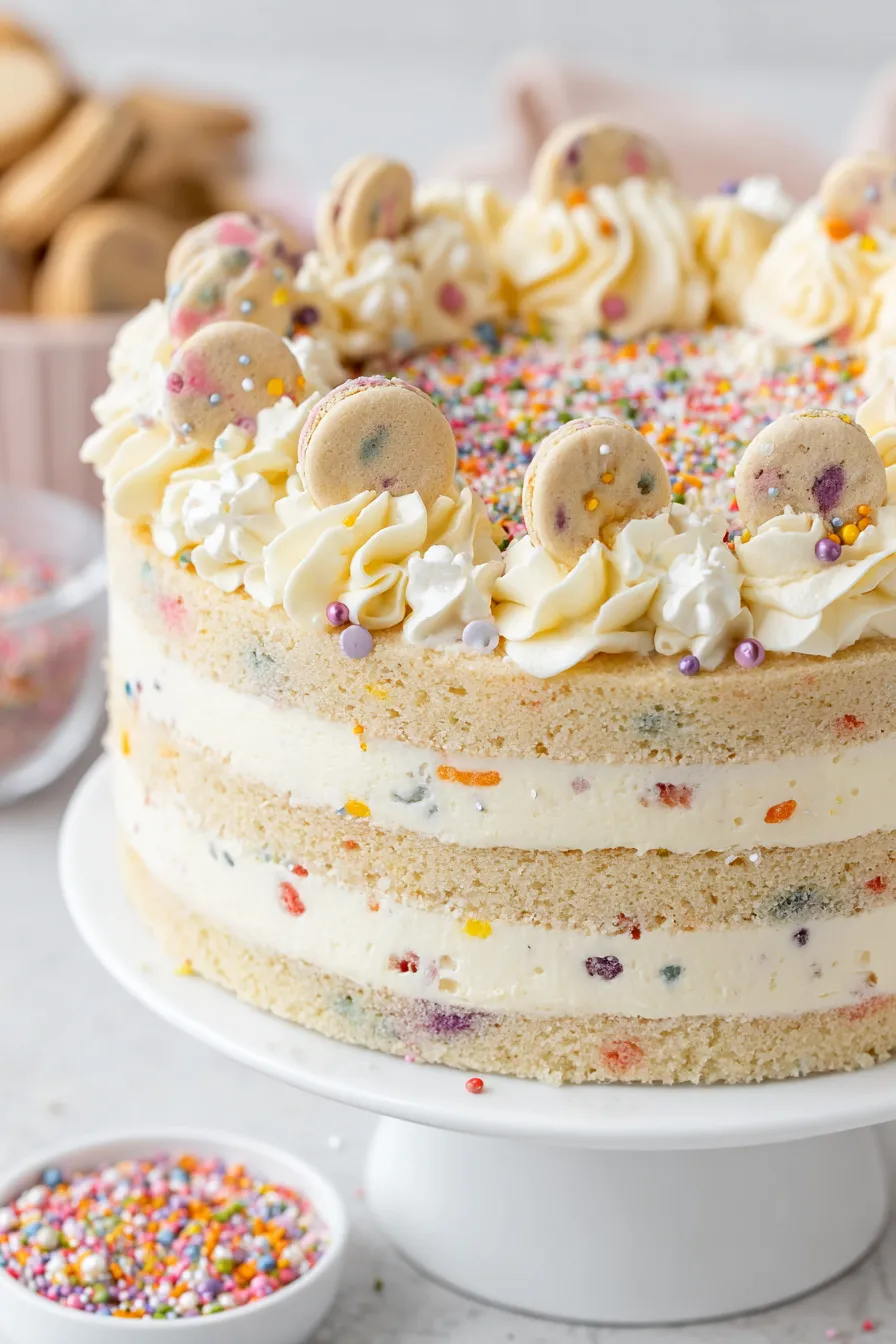
Whip the cream: Pour 1 2/3 cups cold heavy cream into a chilled mixing bowl. Add 1/3 cup sifted powdered sugar and 1 teaspoon vanilla. Using an electric mixer on medium speed, beat until soft peaks form, then increase speed and beat until stiff peaks hold their shape, about 3 to 4 minutes total. Watch the cream closely to avoid overbeating into butter. Prepare the pan: Line the base of an 8-inch (20 cm) springform pan with a thin layer of whipped cream, about 1/2 cup spread evenly. This base helps the first cookie layer adhere and keeps edges tidy when you remove the springform ring. Layer the cookies: Arrange a single layer of shortbread cookies across the cream, placing them snugly so there are minimal gaps. If needed, break one or two cookies to fill edges. Press them gently into the cream so they are partially embedded; this yields even soaking and structure. Add cream and repeat: Spoon another 1/2 cup of whipped cream over the cookies and spread to cover. Add a second layer of cookies, pressing lightly, and finish with the remaining whipped cream so the final visible layer is smooth cream. Reserve a small amount in a piping bag for decoration if you like. Decorate and chill: Pipe small rosettes or stars of the reserved cream across the top using a star tip, then scatter 1/3 cup rainbow sprinkles evenly. Cover the pan and refrigerate for at least 4 hours, ideally overnight, so the cookies soften into cake-like layers while still holding a gentle bite. Slice and serve: Run a knife under hot water and dry it before slicing to get clean edges. Release the springform ring, transfer slices to plates, and serve chilled. Keeps well refrigerated for up to 3 days.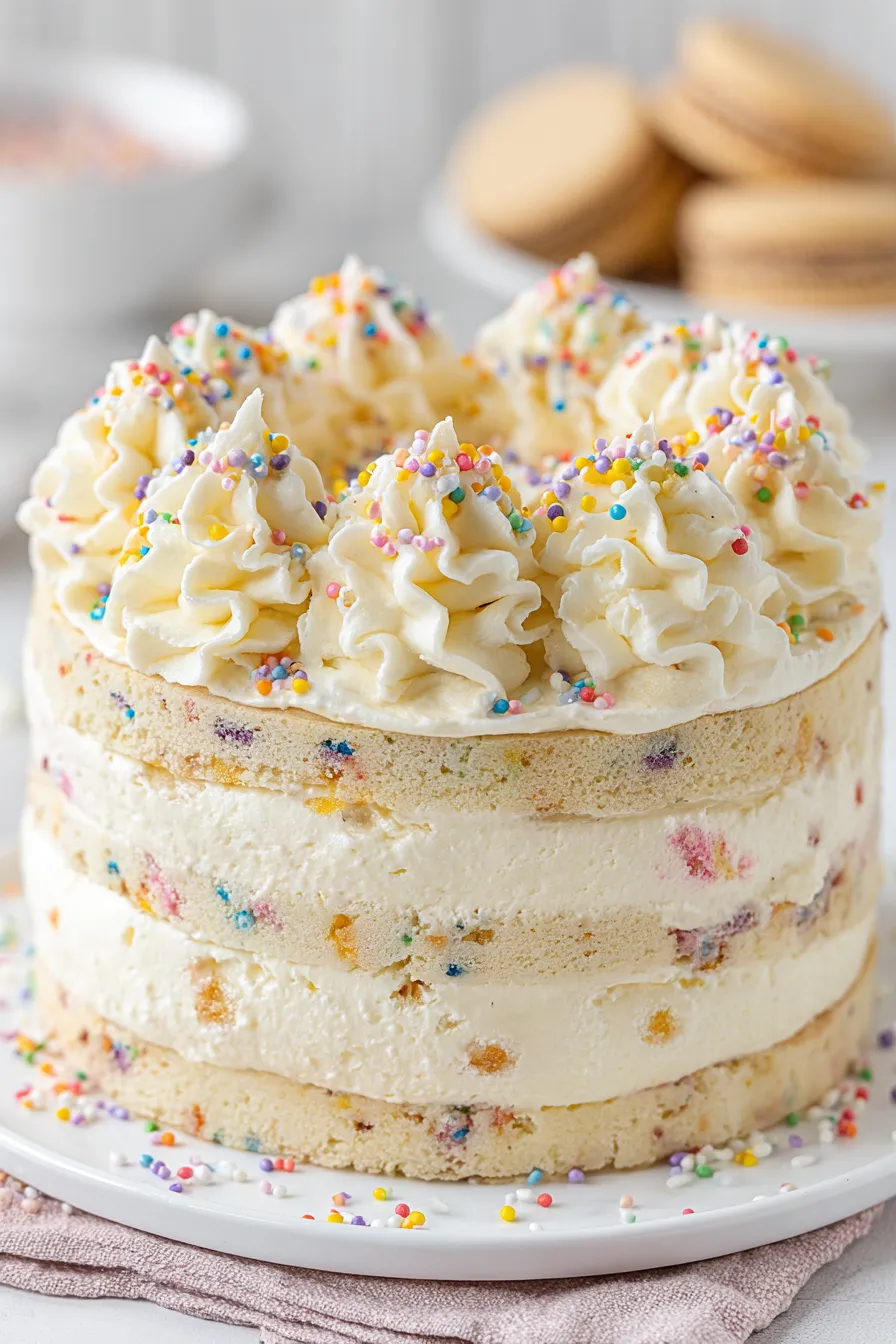
You Must Know
- Refrigerate at least 4 hours or overnight; the resting time lets the cookies absorb moisture and become sliceable without losing structure.
- Store in an airtight container in the refrigerator for up to 3 days; texture is best within 48 hours.
- High in fat and sugar — one slice contains roughly 350 to 400 calories depending on portion size; serve smaller slices for parties.
- Freezes poorly; the whipped cream will separate upon thawing, so avoid freezing unless you use stabilized cream.
My favorite thing about this version is how portable it is. I once brought it to a potluck in a cooler and people were delighted to find that the slices looked and tasted as if they had been freshly plated. The simple components mean you can tweak flavors — aromatic extracts or citrus zest in the cream are subtle upgrades — but the classic vanilla-sprinkle pairing is reliably joyful.
Storage Tips
Store the cake in the refrigerator covered tightly with plastic wrap, or place the whole springform pan inside a large airtight container to prevent absorption of other flavors. Keep chilled until just before serving. Slices can be kept in a lidded container for up to 3 days; after that the cookie layers become overly soft. If you need to transport the cake, freeze it for 30 minutes to firm it up, then wrap carefully and keep cool in a cooler. Avoid long periods at room temperature because of the dairy content.
Ingredient Substitutions
Swap shortbread for graham crackers for a slightly less buttery profile and a hint of molasses, or use thin tea biscuits for a lighter bite. For a gluten-free option, choose certified gluten-free shortbread or gluten-free graham-style cookies. To reduce sugar, use a sugar-free powdered sweetener designed for baking, but note the texture may change. For a stable whipped topping that holds up longer on warm days, fold 1 to 2 tablespoons of instant vanilla pudding mix into the whipped cream.
Serving Suggestions
Serve slices with a small spoonful of berry compote or a drizzle of melted chocolate for contrast. Fresh berries such as raspberries or blueberries add bright acidity that complements the richness. For brunch, plate thin slices alongside coffee, or present the cake as a whimsical finish to a casual dinner party. Garnish with extra sprinkles, edible gold leaf for a celebratory touch, or a scattering of grated citrus zest for added aroma.
Cultural Background
Layered icebox desserts trace their roots to early 20th-century refrigeration innovations when home cooks began assembling cold desserts that required no baking. Icebox cakes became especially popular in American kitchens because they were simple, adaptable and ideal for warm-weather entertaining. The funfetti twist borrows from birthday-cake traditions — the sprinkles provide visual celebration — and combines it with the convenience of an assembled chilled dessert.
Seasonal Adaptations
In summer, top with fresh summer fruit and citrus zest; in autumn, swap sprinkles for finely chopped toasted nuts and a pinch of cinnamon in the cream. For winter celebrations, use red and green sprinkles or crushed peppermint on top. The method is forgiving enough to accept flavored extracts, liqueurs or a thin layer of jam between layers for seasonal variation.
Meal Prep Tips
Whip the cream and store it in a covered bowl in the refrigerator for up to 4 hours before assembly. Assemble the cake the evening before serving to allow the cookies ample time to soften. Portion slices into meal-prep containers for grab-and-go desserts, keeping them chilled until consumption. Use plastic cutlery and insulated bags when transporting single portions for picnics or lunches.
This Funfetti icebox treat is as much about the presentation as it is about the taste — it’s easy to make but reliably memorable. Invite a few friends, pour the coffee, and let the colorful slices do the talking.
Pro Tips
Chill your mixing bowl and beaters in the freezer for 10 minutes to help the cream whip faster and hold peaks.
Sift powdered sugar to prevent gritty texture in the whipped cream and to ensure smooth sweetness.
Warm your knife under hot water, dry it, and then slice to get clean, attractive pieces without dragging the cream.
This nourishing funfetti icebox cake recipe is sure to be a staple in your kitchen. Enjoy every moist, high protein slice — it is perfect for breakfast or as a wholesome snack any time.
FAQs about Recipes
How long can I store the cake?
Yes. The cake will keep in the refrigerator for up to 3 days; texture is best within the first 48 hours.
How can I make the whipped cream more stable?
Use stabilized whipped cream (add 1 to 2 tablespoons instant pudding mix) or a whipped topping alternative for longer hold time in warm conditions.
Tags
Funfetti Icebox Cake
This Funfetti Icebox Cake recipe makes perfectly juicy, tender, and flavorful steak every time! Serve with potatoes and a side salad for an unforgettable dinner in under 30 minutes.
Instructions
Whip the cream
Chill bowl and beaters if possible. Combine heavy cream, powdered sugar and vanilla in the chilled bowl and beat on medium to high speed until stiff peaks form, about 3 to 4 minutes.
Prepare the pan
Spread about 1/2 cup whipped cream over the bottom of an 8-inch springform pan to anchor the first cookie layer.
Layer cookies
Arrange shortbread cookies in a single snug layer over the cream, breaking cookies to fill gaps for even coverage.
Add cream and repeat
Spread another 1/2 cup of whipped cream over the cookies, add a second cookie layer, and finish with remaining whipped cream so the top is all cream.
Decorate and chill
Pipe extra rosettes using a star tip if desired, sprinkle with rainbow sprinkles, cover and refrigerate for at least 4 hours or overnight.
Slice and serve
Run a hot, dry knife for clean slices. Release the springform ring and serve chilled. Keeps well refrigerated up to 3 days.
Last Step: Please leave a rating and comment letting us know how you liked this recipe! This helps our business to thrive and continue providing free, high-quality recipes for you.
Nutrition
Did You Make This?
Leave a comment & rating below or tag
@delishum on social media!
Categories:
You might also like...

Gooey Marshmallow Chocolate Brownies
Thick chocolate chunk brownies crowned with melted mini marshmallows and drenched in glossy chocolate frosting for the ultimate fudgy, crowd-pleasing bite.

Buttery Pecan Pie Bars
Buttery shortbread crust meets a lush brown sugar pecan topping. Crunchy, caramelly, and ready with just 10 minutes of prep for effortless indulgence.

No-Crack Pumpkin Cheesecake
Ultra-smooth pumpkin cheesecake with warm spice and a sturdy graham crust. A showstopper on its own, unforgettable with caramel and rum-kissed whipped cream.
Did You Make This?
Leave a comment & rating below or tag @delishum on social media!
Rate This Recipe
Share This Recipe
Enjoyed this recipe? Share it with friends and family, and don't forget to leave a review!
Comments (1)
This recipe looks amazing! Can't wait to try it.
Comments are stored locally in your browser. Server comments are displayed alongside your local comments.

Hi, I'm Amelia!
What's Popular

30-Minute Meals!
Join to receive our email series which contains a round-up of some of our quick and easy family favorite recipes.