
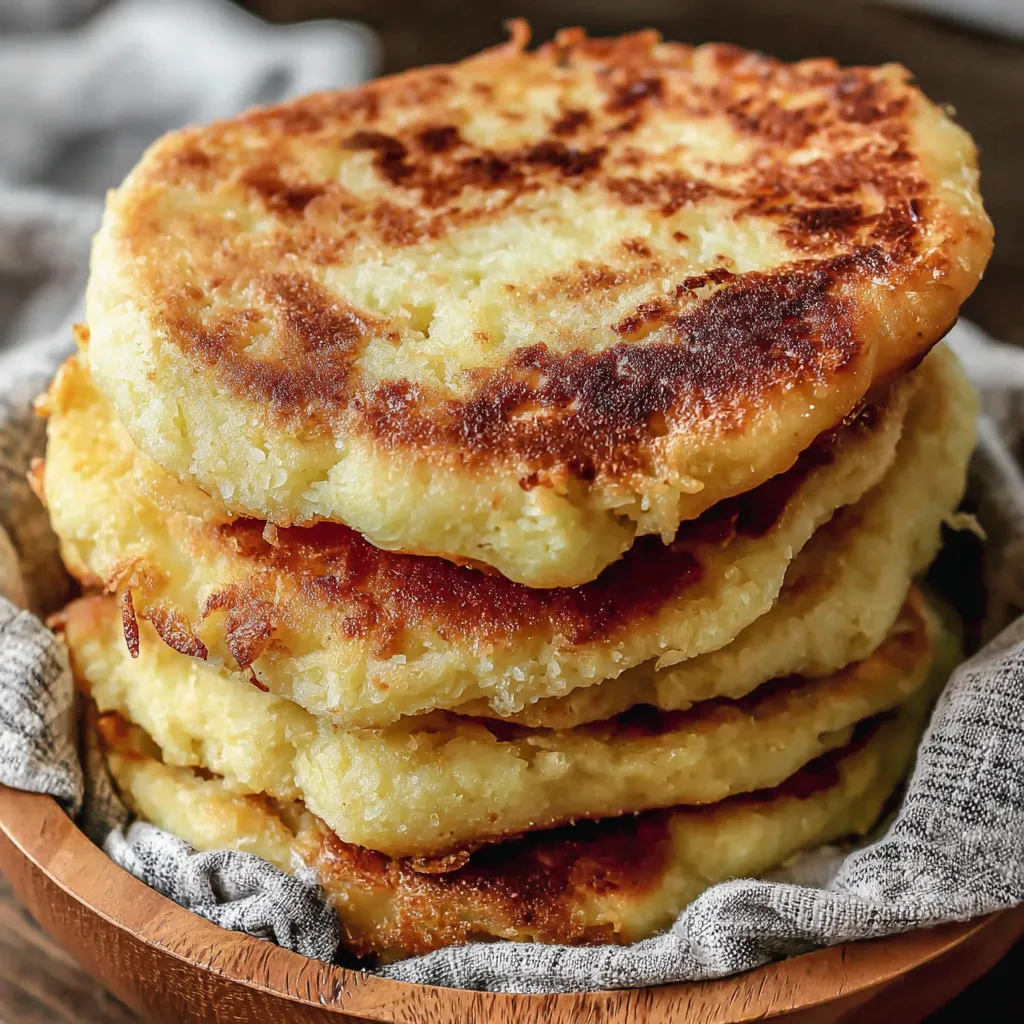
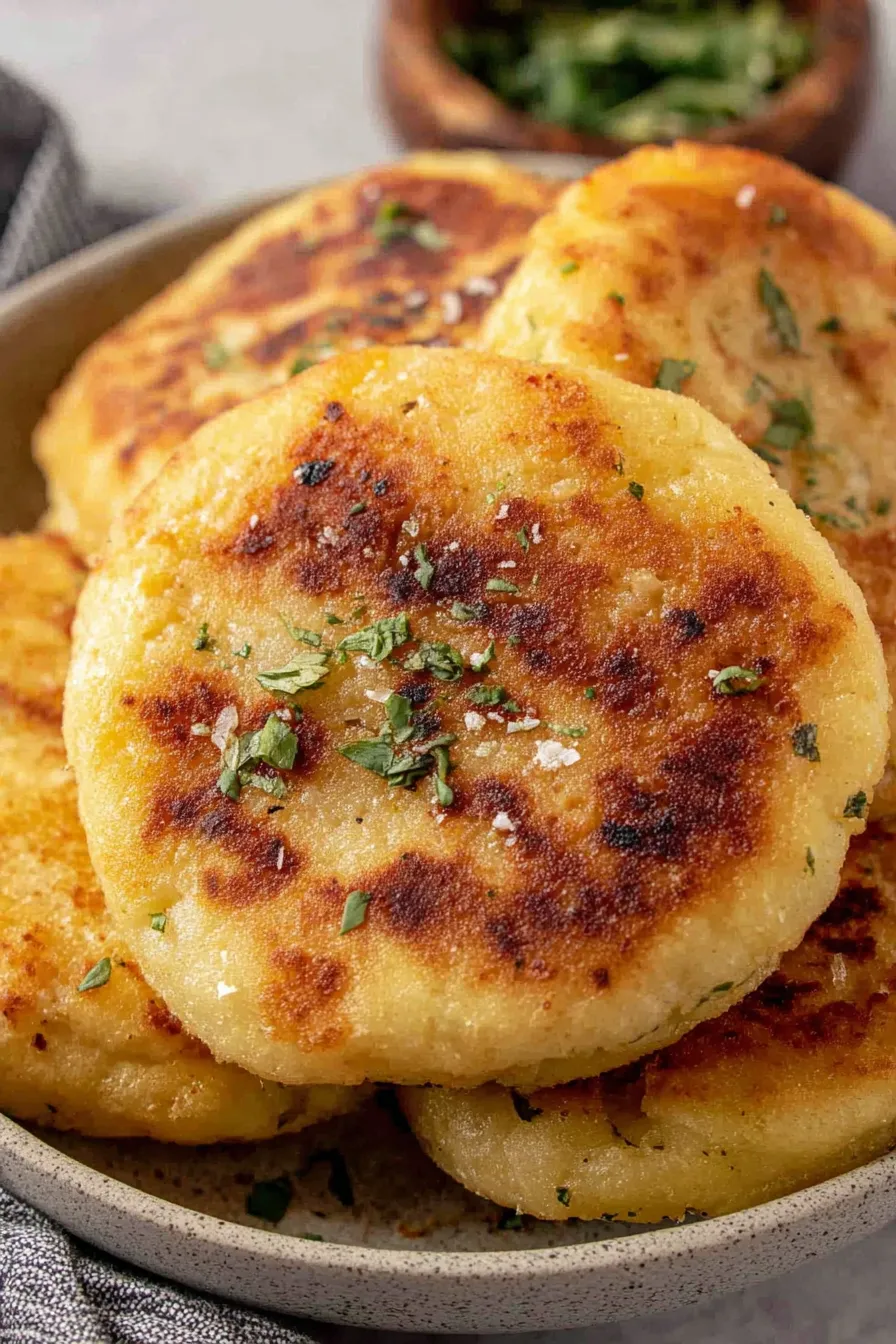
Crispy Maseca Gorditas

Golden, crunchy on the outside and tender inside masa pockets made with Maseca — perfect for stuffing with beans, cheese, or spiced meat for a comforting handheld meal.
This recipe for crispy Maseca gorditas has been a weekend favorite in my kitchen for years. I first learned to make them during a summer visit to a small market in central Mexico, where a vendor showed me how a simple dough of masa harina and hot water can transform into a crunchy, pillowy vessel for all kinds of fillings. The texture is what makes these special: a firm, golden exterior that gives a satisfying crackle, with an interior soft enough to cradle beans, cheese, or shredded meat. I make a big batch when friends come over, and everyone ends up assembling their own gorditas at the table.
What I love most is how forgiving the technique is. With just two main pantry ingredients and a little practice shaping and frying, you can get consistent results. I often make these for brunch with chorizo and scrambled eggs, and on quieter nights we fill them with refried beans and crumbled queso fresco. They travel well to a picnic and reheat nicely in a skillet to regain that crisp exterior. Read on for step-by-step guidance, troubleshooting tips, and ideas for fillings so you can make them confidently at home.
Why You'll Love This Recipe
- Makes crispy, handheld pockets that are perfect for casual gatherings — ideal when you want a build-your-own meal that’s messy and fun.
- Uses pantry staples: Maseca (masa harina) and hot water are the core, so you can make them on short notice with a quick shopping list.
- Ready in about 45 minutes from start to finish: roughly 15 minutes active prep and 30 minutes of frying and finishing, so you can multitask with fillings.
- Flexible fillings accommodate vegetarians and meat eaters alike — try beans and cheese, shredded beef, or a spicy chorizo-egg scramble.
- Make-ahead friendly: dough can be wrapped and chilled for a day, and cooked gorditas freeze well for up to 2 months.
- Budget-friendly and gluten-free when using certified masa harina, making it accessible for many dietary needs.
I still remember the first time I nailed the crisp exterior and the soft interior — my mother declared them better than the ones we bought at the market. Over time I adjusted frying temperature and added a short low-heat finish step to ensure the center cooks through without burning the outside. Family members now request these for weekend brunches and potlucks; once you taste the contrast of textures, they become a staple.
Ingredients
- Maseca (masa harina): Use 2 cups of Maseca, the instant corn masa flour labeled for tortillas. Look for the brand you trust — Maseca is widely available and gives a reliable texture. Fresh, dry masa absorbs hot water evenly for a consistent dough.
- Hot water: 1 1/2 cups of boiling or very hot water measured from about 3 cups brought to a boil. Hot water gelatinizes the corn starch, producing a cohesive dough. Keep the remaining boiled water warm in case you need to adjust consistency.
- Vegetable oil (optional): 1 to 2 tablespoons added to the dough will yield a slightly softer interior. Use neutral oil like canola or vegetable if you prefer a pillowy center.
- Oil for frying: Enough neutral oil to cover the skillet base, about 2 to 3 cups depending on pan size. Use vegetable or canola oil with a high smoke point.
- Salt (optional): A pinch of salt in the dough enhances flavor; add to taste if desired. If you plan to season fillings heavily, you can omit it from the dough.
Instructions
Prepare the dough: Bring approximately 3 cups of water to a boil. In a large mixing bowl, add 2 cups of Maseca and 1 1/2 cups of the hot water. If using, add 1 tablespoon vegetable oil and a pinch of salt. Mix with your hands until the dough resembles creamy peanut butter in texture — smooth, pliable, and holding together without cracking. If it feels too sticky, sprinkle in another tablespoon of masa at a time; if too dry, add warm water teaspoon by teaspoon. Form the dough into a smooth ball and cover it with a damp towel to prevent drying while you work. Rest and test: Let the dough rest for 5 minutes under the towel; this allows the masa to fully hydrate. To test, pinch off a small piece and roll into a ball, then flatten. It should not crack at the edges. If it does, add a bit more water and knead briefly. Shape the gorditas: Divide the dough into 8 to 10 equal portions for palm-sized gorditas. Roll each portion into a ball, then press between your palms or use a plastic-lined plate to gently flatten into saucer-shaped disks about 1/4 inch thick. Keep them evenly thick so they cook uniformly. If the surface dries, cover shaped disks with the damp towel. Heat the skillet: Place a heavy skillet over medium-high heat and add enough oil to cover the base for frying, roughly 1/8 to 1/4 inch deep. Heat until shimmering and a small piece of dough sizzles on contact. Maintain a steady heat — too hot and the outside will brown before the interior cooks, too cool and the gorditas will absorb excess oil. Fry the gorditas: Carefully place the gorditas into the hot oil. Fry for about 3 minutes per side until golden-brown and crisp. Then reduce the heat to low and continue cooking for an additional 7 to 9 minutes per side. This low finish ensures the interior has time to cook through without over-browning the exterior. Flip gently with a spatula and look for even color and a firm, hollow-sounding center. Split and fill: Remove gorditas to a wire rack or paper towel to drain briefly. Using a sharp knife, slice a pocket open along the edge, being careful not to cut all the way through. Stuff with fillings such as refried beans, shredded beef, crumbled cheese, or scrambled eggs. Serve immediately while still warm and crisp.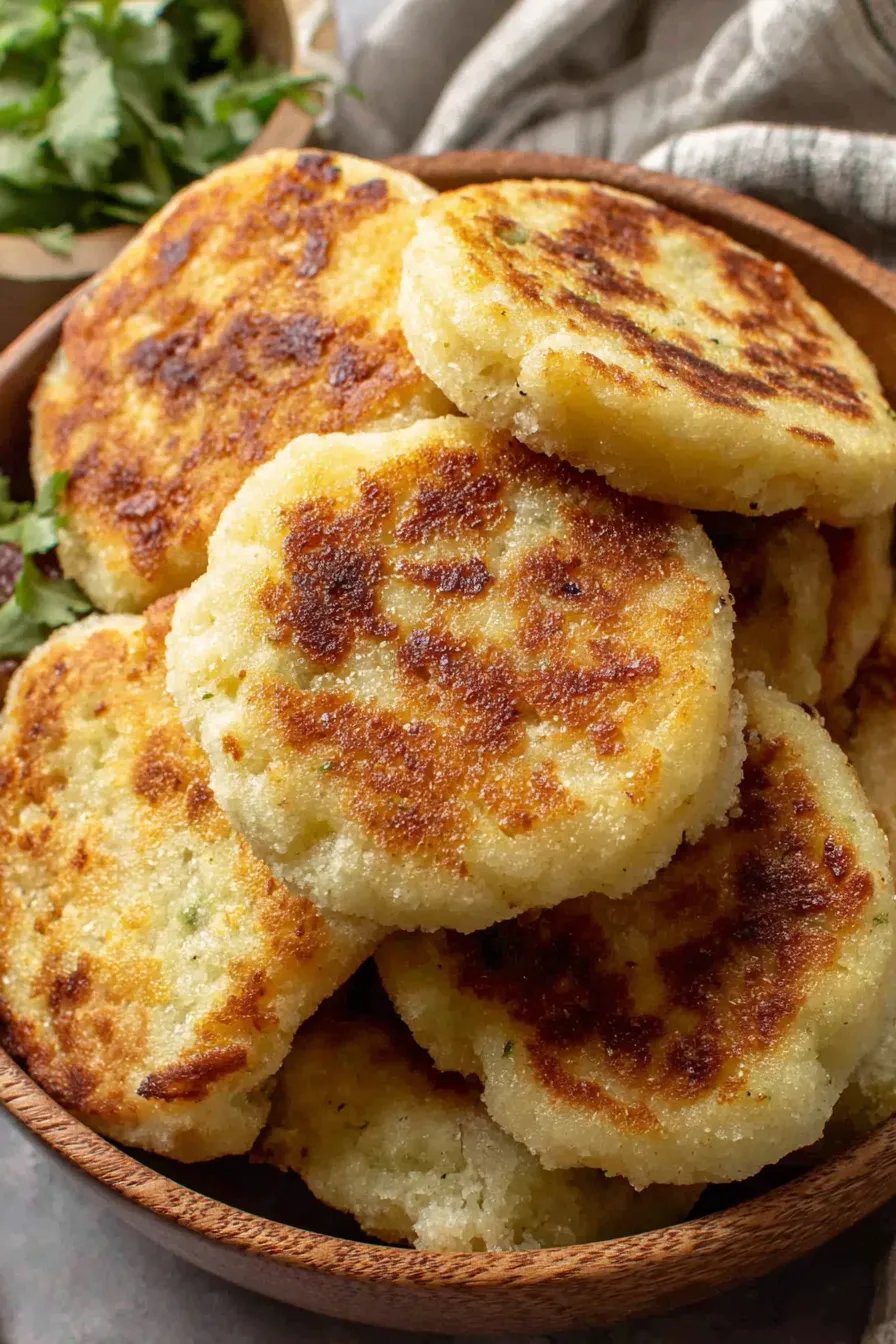
You Must Know
- Texture is everything: the dough should feel like peanut butter — pliable, not sticky or crumbly.
- Control oil temperature: start hot for a fast sear, then reduce heat to cook through without burning.
- Storage: cooked gorditas keep in the fridge for up to 4 days; freeze for 2 months in a single layer then bagged.
- Dietary note: using certified masa harina keeps this naturally gluten-free, and the basic dough is vegan.
- Make-ahead: dough can be refrigerated for a day; bring to room temperature before shaping to avoid cracking.
My favorite aspect is the communal assembly — everyone builds their own gordita with toppings arranged on the table. Family members often say the crisp exterior paired with a creamy bean filling is the ultimate comfort. I learned to lower the heat during finishing after botching an early batch that browned too fast while the center stayed doughy; that adjustment made all the difference.
Storage Tips
Store cooled gorditas in an airtight container in the refrigerator for up to 4 days. To freeze, place gorditas in a single layer on a baking sheet and freeze until firm, then transfer to a freezer bag and store for up to 2 months. Reheat from frozen in a preheated skillet over medium heat for 3 to 5 minutes per side to restore crispness, or bake at 375°F (190°C) for 10 to 12 minutes. Avoid microwaving if you want to keep the exterior crisp; microwave reheating will make them soft.
Ingredient Substitutions
If you don’t have Maseca, use another brand of masa harina labeled for tortillas — avoid plain corn flour or masa for tamales, which can vary. For a softer interior, add 1 to 2 tablespoons of vegetable oil to the dough. If you want a lighter, slightly puffier texture, replace up to 1/4 cup of the masa with masa prepared for tortillas combined with a tablespoon of cornstarch, but test one piece first to ensure desired texture. For a lower-fat method, pan-fry with 2 tablespoons of oil brushed on the skillet and cook a bit longer at medium heat.
Serving Suggestions
Serve warm with classic fillings: refried beans and queso fresco, shredded beef with pickled onion, or chorizo with scrambled eggs for brunch. Add bright garnishes like chopped cilantro, a squeeze of lime, and a simple salsa roja or salsa verde. For a light meal, pair with a crisp green salad and pickled vegetables; for a heartier spread, offer Mexican rice and grilled peppers. Present a toppings bar so guests can customize their own — it’s an ideal format for casual entertaining.
Cultural Background
Gorditas are a beloved part of Mexican street food and home cooking. The name means “little fatties,” referring to their plump, stuffed form. Traditionally, gorditas are cooked on a comal or griddle and filled with regional ingredients such as chicharrón, carnitas, or local cheeses. The crisp-fried version is especially popular at markets and roadside stands where they’re stuffed on demand. This version with Maseca brings that tradition into a home kitchen with a simple, reliable dough.
Seasonal Adaptations
Adapt fillings to the season: in summer, stuff with grilled zucchini, charred corn, and cotija cheese; in fall, try slow-cooked pumpkin and epazote with black beans; in winter, fill with braised beef and roasted root vegetables. Swap toppings to suit holidays — for a festive twist, add pomegranate arils and a citrusy salsa for brightness. Adjust frying technique slightly in cold weather by allowing dough to warm longer at room temperature before shaping to avoid cracking.
Meal Prep Tips
For meal prep, shape all dough disks and layer them between sheets of parchment, then refrigerate for up to 24 hours. Cook on the day you serve or freeze uncooked disks for future use. If preparing fillings in advance, keep moist and saucy components separate to avoid sogginess — reheat fillings gently and assemble on demand. When reheating, use a skillet to regain crispness rather than the microwave.
Success Stories
Readers often tell me these gorditas changed their weekend breakfasts: one friend swapped store-bought tortillas for these and now serves them every Sunday with leftover roast chicken and avocado. Another reader wrote that the frying technique tips prevented soggy pockets and made her family’s potluck contribution the runaway hit. Small refinements like resting the dough and the low-heat finish create consistent success.
Give these a try the next time you want a hands-on, comforting meal. The combination of crunchy exterior and tender interior makes them endlessly adaptable and deeply satisfying to share.
Pro Tips
Aim for dough that feels like peanut butter in texture — smooth and pliable.
Start frying at medium-high to sear quickly, then reduce heat to finish through without burning.
Keep shaped disks covered with a damp towel to prevent drying before frying.
Use a heavy skillet for even heat distribution and consistent browning.
Test one gordita first to dial in frying times for your specific pan and stovetop.
This nourishing crispy maseca gorditas recipe is sure to be a staple in your kitchen. Enjoy every moist, high protein slice — it is perfect for breakfast or as a wholesome snack any time.
FAQs about Recipes
How do I know when the oil is hot enough?
Yes. Use a thermometer or the small piece test: if a tiny ball of dough sizzles and browns slowly without burning, the oil is at the right temperature.
Can I freeze gorditas?
Freeze cooked gorditas in a single layer until firm, then bag them for up to 2 months. Reheat in a skillet to regain crispness.
Tags
Crispy Maseca Gorditas
This Crispy Maseca Gorditas recipe makes perfectly juicy, tender, and flavorful steak every time! Serve with potatoes and a side salad for an unforgettable dinner in under 30 minutes.
Ingredients
Dough
Frying
Instructions
Prepare the dough
Boil about 3 cups of water. In a large bowl combine 2 cups of Maseca with 1 1/2 cups hot water. Add optional oil and a pinch of salt. Mix by hand until the dough resembles peanut butter; adjust with more masa or water as needed. Form into a ball and cover with a damp towel.
Rest and test
Let the dough rest 5 minutes to hydrate. Pinch a small piece and flatten to check for cracks. If edges crack, add warm water teaspoon by teaspoon until pliable.
Shape the gorditas
Divide into 8–10 balls. Flatten each into a saucer-shaped disk about 1/4 inch thick using your palms or between plastic sheets. Keep them covered until ready to fry.
Heat the skillet
Heat a heavy skillet over medium-high and add oil to cover the base. Heat until shimmering; test with a small piece of dough to ensure proper sizzle.
Fry the gorditas
Fry each gordita 3 minutes per side until golden. Reduce heat to low and continue 7–9 minutes per side to cook through. Drain briefly on a rack or towels.
Split and fill
Using a sharp knife, slice open each gordita to form a pocket and stuff with desired fillings like refried beans, cheese, shredded beef, or eggs. Serve warm.
Last Step: Please leave a rating and comment letting us know how you liked this recipe! This helps our business to thrive and continue providing free, high-quality recipes for you.
Nutrition
Did You Make This?
Leave a comment & rating below or tag
@delishum on social media!
Categories:
You might also like...

Gooey Marshmallow Chocolate Brownies
Thick chocolate chunk brownies crowned with melted mini marshmallows and drenched in glossy chocolate frosting for the ultimate fudgy, crowd-pleasing bite.

Buttery Pecan Pie Bars
Buttery shortbread crust meets a lush brown sugar pecan topping. Crunchy, caramelly, and ready with just 10 minutes of prep for effortless indulgence.

No-Crack Pumpkin Cheesecake
Ultra-smooth pumpkin cheesecake with warm spice and a sturdy graham crust. A showstopper on its own, unforgettable with caramel and rum-kissed whipped cream.
Did You Make This?
Leave a comment & rating below or tag @delishum on social media!
Rate This Recipe
Share This Recipe
Enjoyed this recipe? Share it with friends and family, and don't forget to leave a review!
Comments (1)
This recipe looks amazing! Can't wait to try it.
Comments are stored locally in your browser. Server comments are displayed alongside your local comments.

Hi, I'm Amelia!
What's Popular

30-Minute Meals!
Join to receive our email series which contains a round-up of some of our quick and easy family favorite recipes.