
Crispy Baked Tacos

Wide-bottom hard corn shells filled with seasoned beef and melted cheddar-jack, baked until crisp for an easy, crowd-pleasing dinner.
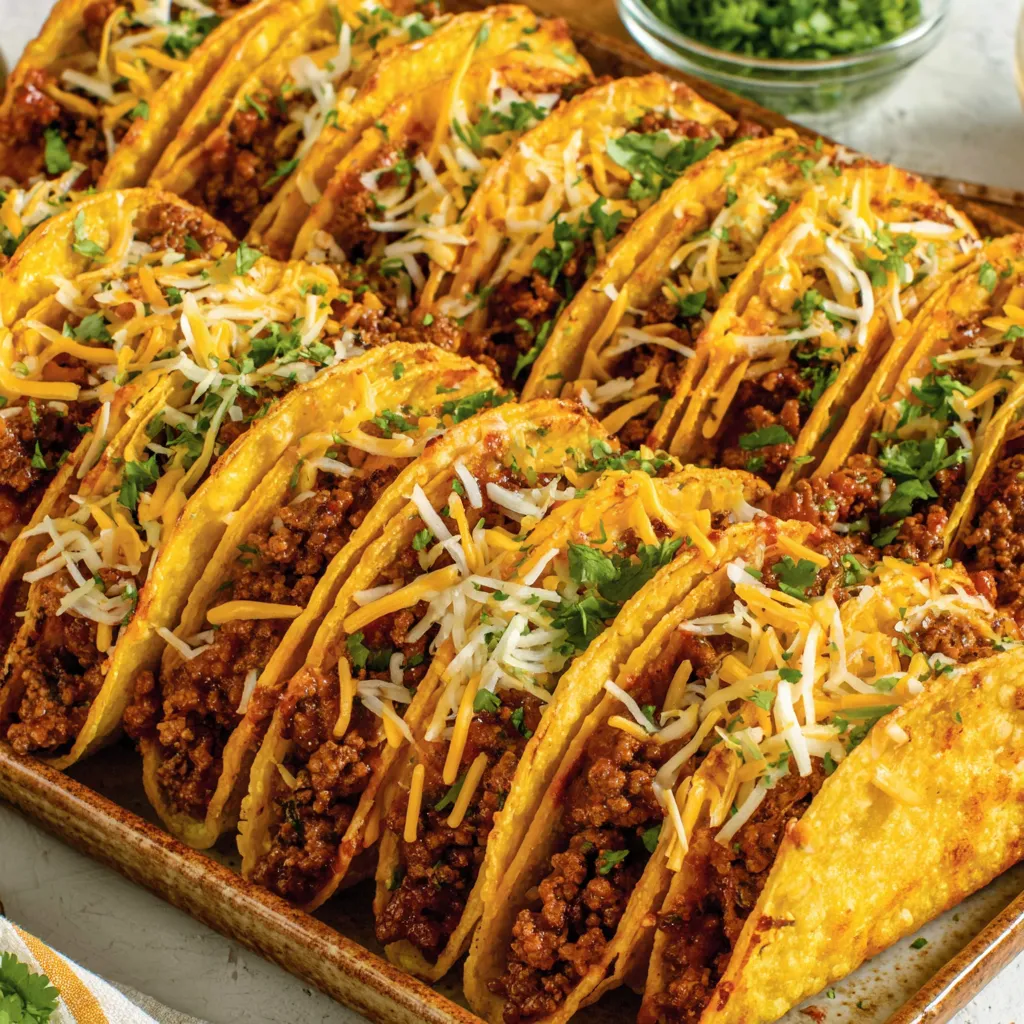
This recipe for crispy baked tacos is one of those weeknight winners that turned a hurried grocery stop into a family ritual. I first put these together on a rainy evening when I wanted the texture of a fried taco without the fuss of frying. The wide, flat-bottom hard corn shells stand upright in a baking dish, cradle a richly seasoned beef filling, and emerge with perfectly melted cheese and a satisfying crunch. My kids loved how easy they were to hold, and guests always ask how I kept the shells from going soggy.
I discovered this method after trying several variations and learning which details make the biggest difference: draining excess grease, simmering the filling just long enough for flavor to concentrate, and using wide-bottom shells so they bake evenly without toppling. The combination of browned ground beef, gently softened onions, bright tomato sauce and a familiar taco seasoning packet delivers classic flavors, while the cheddar-jack blend gives a creamy, sharp finish. This dish is at home on a busy weeknight, at a casual dinner party, or as a potluck contribution that disappears fast.
Why You'll Love This Recipe
- Ready in about 30 minutes from start to finish, making this a dependable go-to for busy weeknights and last-minute guests.
- Uses pantry staples and a single packet of taco seasoning, so shopping is simple and substitutions are easy if you prefer homemade spice mixes.
- The wide hard corn shells with flat bottoms bake upright in a dish, delivering crispness on every bite without deep frying or complicated equipment.
- Make-ahead friendly: prepare the filling up to two days in advance and assemble just before baking to retain crunch.
- Crowd-pleasing and customizable: swap proteins, add fresh toppings, or turn it into a layered bake for feeding a larger group.
When I first served these to my extended family, the table went quiet for a moment while everyone savored their first bite, then erupted into requests for seconds. The convenience and flavor consistently earn praise from picky eaters and adventurous palates alike.
Ingredients
- 10 hard stand and stuff taco shells: Look for wide hard corn taco shells with flat bottoms so they stand upright in a 9 by 13 baking dish. Brands like Don Pancho or Ortega work well; choose yellow corn for a neutral flavor and sturdy texture.
- 1 tablespoon olive oil: A light olive oil prevents sticking when sautéing onions and browning the meat. Use extra virgin if you prefer its flavor, but a neutral olive oil gives a cleaner taste.
- 1 1/2 pounds ground beef (85/15): This ratio balances flavor and fat for good browning without excessive grease. Ground round labeled 85 percent lean is perfect.
- 3/4 cup diced yellow onion: Finely diced so it softens quickly and melds into the filling. Yellow onions are slightly sweet when cooked and pair well with the tomato base.
- 1/2 teaspoon salt and 1/4 teaspoon black pepper: Basic seasoning to enhance the beef and onion; adjust to taste after adding the taco seasoning.
- 3/4 cup tomato sauce: Adds moisture and acidity to bind the filling. Use plain tomato sauce, not pasta sauce, so the seasoning profile remains classic taco style.
- 1 ounce packet taco seasoning: A convenient blend that keeps the flavor reliably familiar. For homemade, combine 1 tablespoon chili powder, 1 teaspoon cumin, 1 teaspoon paprika, 1/4 teaspoon oregano, and a pinch each of garlic powder and onion powder.
- 1 1/2 cups shredded cheddar-jack cheese: A pre-shredded blend of cheddar and Monterey Jack melts quickly and creates a gooey top. Measure loosely packed.
- 1 tablespoon finely chopped fresh cilantro (optional): Brightens the finished dish when sprinkled over the melted cheese just before serving.
Instructions
Preheat the oven: Set your oven to 400 degrees Fahrenheit and position a rack in the middle. Preheating ensures the shells crisp immediately when they go into the hot oven. Arrange the shells: Stand the 10 hard taco shells upright in a 9 by 13 inch baking dish without overcrowding. Give each shell a little breathing room so heat circulates evenly and you get consistent crisping across all shells. Brown the beef and onions: Heat 1 tablespoon olive oil in a large skillet over medium-high heat. Add 3/4 cup diced yellow onion and 1 1/2 pounds ground beef. Season with 1/2 teaspoon salt and 1/4 teaspoon black pepper. Cook 8 to 10 minutes, breaking up the meat with a spatula until no pink remains and the onions are translucent. For even browning, avoid overcrowding the pan and give the beef a chance to sear briefly between stirs. Drain excess grease: Once the beef is cooked, carefully drain off as much fat as possible. Excess liquid will make the filling too wet and risk soggy shell bottoms when baking. A quick tilt of the pan or using a fine mesh strainer works well. Season and finish the filling: Return the skillet to medium heat and stir in 3/4 cup tomato sauce and a 1 ounce packet of taco seasoning. Cook another 2 to 3 minutes, stirring, until the mixture thickens slightly and the beef absorbs the sauce but is not dry. Taste and adjust salt if needed. Fill the shells: Divide the filling between the 10 prepared shells, using about one third to one half cup per shell so each taco holds a generous portion but remains stable in the shell. Top with cheese and bake: Sprinkle the shredded cheddar-jack evenly across the filled shells. Transfer to the preheated oven and bake 5 to 7 minutes until the cheese is melted and the shells are crisp to the touch. Watch closely to avoid over-browning. Garnish and serve: Remove from oven and, if using, lightly sprinkle 1 tablespoon finely chopped cilantro over the top. Serve hot with lime wedges, salsa, or pickled jalapeños on the side.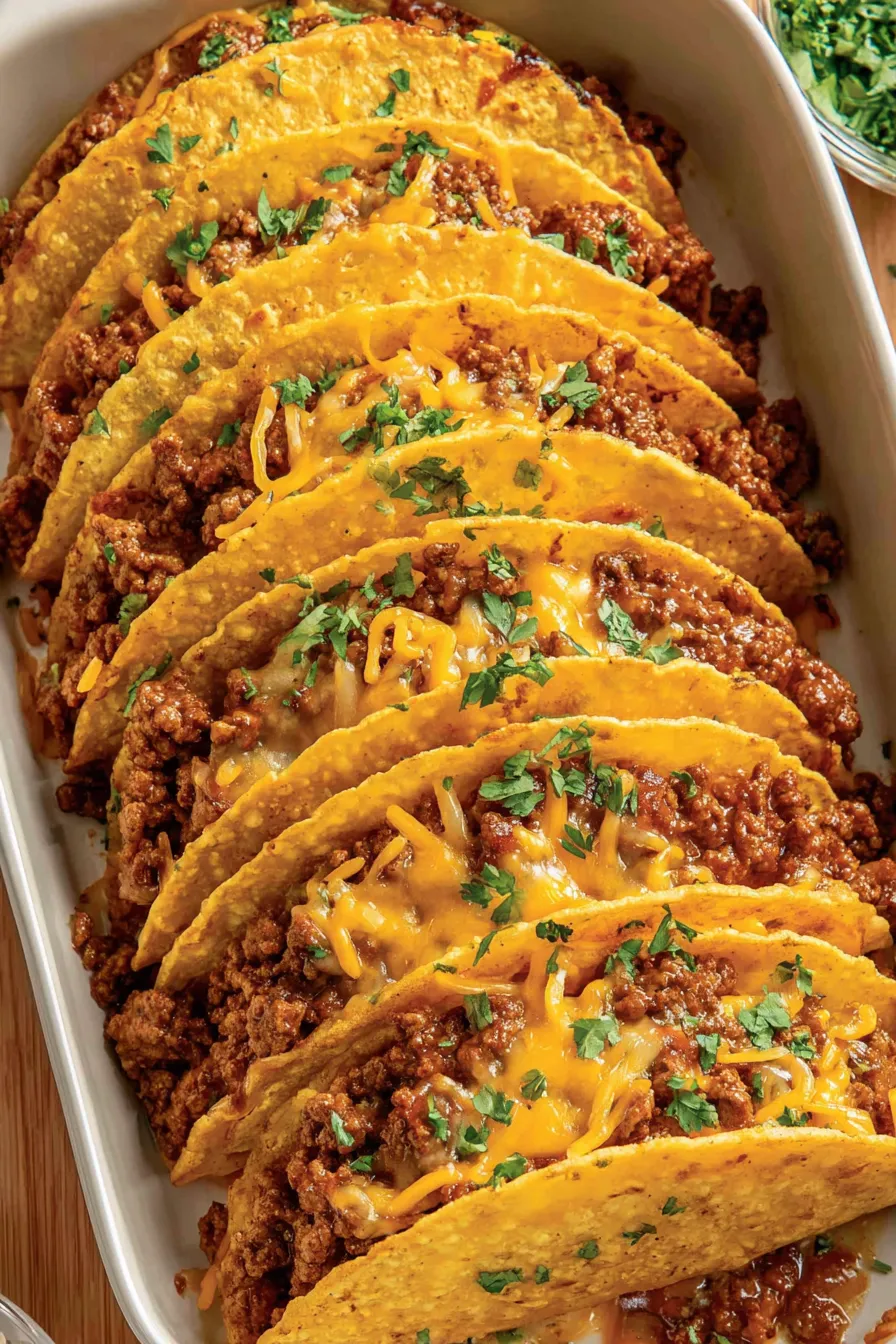
You Must Know
- These tacos are high in protein and make a balanced meal when served with a fresh salad or corn and black bean side.
- Filling can be made ahead and refrigerated up to 48 hours; assemble and bake within two days for the best texture.
- Freeze leftover assembled tacos in an airtight container for up to 2 months, then reheat from frozen at 350 degrees Fahrenheit until warmed through and cheese remelts.
- Because these use corn shells, they are naturally gluten-free; verify packaging if celiac disease or severe sensitivity is a concern.
I love how versatile this method is. Once I learned to simmer the filling briefly after adding tomato sauce, the flavor deepened and the shells stayed crisp. A neighbor once brought a tray of these to a cookout and they were the first to disappear, which convinced me to always double the batch when company is coming.

Storage Tips
To keep the filling at its best, cool it to room temperature, then transfer to an airtight container and refrigerate for up to 48 hours. For longer storage, freeze the filling for up to three months. When reheating refrigerated filling, warm gently on the stovetop over medium-low heat to prevent drying. Assembled tacos are best eaten immediately after baking, but if you have leftovers, store them in a shallow airtight container and refrigerate for up to 24 hours. Reheat in a 350 degrees Fahrenheit oven for 8 to 10 minutes to re-crisp the shells and melt the cheese.
Ingredient Substitutions
If you prefer a lighter option, substitute ground turkey or ground chicken using the same weight and cooking method; drain thoroughly to avoid sogginess. For a vegetarian version, use a crumbled plant-based mince or seasoned cooked lentils in place of beef and add a tablespoon of tomato paste for body. Swap the taco seasoning packet for a homemade blend using chili powder, cumin, paprika, and garlic powder to reduce sodium. If you cannot find wide-bottom shells, slightly overlap standard shells in the dish or use a taco rack to keep them upright while baking.
Serving Suggestions
Serve these with crisp shredded lettuce, diced tomatoes, avocado slices, pickled onions, or a squeeze of lime. A side of cilantro lime rice or a simple black bean salad complements the savory beef. For a party plate, set out bowls of sour cream, salsa, and chopped cilantro for guests to customize. Garnish with fresh cilantro and a few jalapeño slices for heat.
Cultural Background
These tacos draw on classic Mexican-American flavors, blending browned seasoned meat with melted cheese inside corn shells. While traditional Mexican tacos often use soft corn tortillas, the hard shell format gained popularity in the United States and evolved into numerous baked and fried versions. This baked approach modernizes the concept by prioritizing texture and convenience while retaining the essential elements of seasoned meat, cheese, and fresh garnishes.
Seasonal Adaptations
In summer, add grilled corn and fresh tomatoes to the filling and finish with lime and chopped basil or cilantro for brightness. In winter, fold in roasted poblano peppers and a splash of warm chipotle adobo to deepen the flavor. For holiday gatherings, make a double layer casserole by arranging a layer of filled shells, sprinkling with cheese, then repeating to feed a crowd.
Meal Prep Tips
Prepare the filling on Sunday and refrigerate in portioned containers for quick assembly throughout the week. Store shells in their original box to prevent breakage and assemble only when ready to bake. Pack leftover baked tacos with a paper towel barrier in meal prep containers to absorb moisture and reheat in a moderate oven for best texture. For grab-and-go lunches, deconstruct and pack filling and toppings separately from shells to preserve crunch.
These crispy baked tacos are simple, dependable, and endlessly adaptable. Whether you are feeding a family on a weeknight or entertaining friends, they deliver comfort, crunch, and familiar flavors with minimal fuss. Try the variations and make this approach your own.
Pro Tips
Drain excess fat from browned beef to prevent soggy shell bottoms and concentrate flavor.
Use wide-bottom shells that stand upright to ensure even baking and crisping.
Simmer the filling after adding tomato sauce and seasoning for 2 to 3 minutes so the mixture thickens slightly and binds.
This nourishing crispy baked tacos recipe is sure to be a staple in your kitchen. Enjoy every moist, high protein slice — it is perfect for breakfast or as a wholesome snack any time.
FAQs about Recipes
Why are my taco shells soggy after baking?
If the filling seems wet, drain excess grease and simmer until slightly thickened before filling shells to keep bottoms crisp.
Can I make the filling in advance?
Yes, the filling can be made up to 48 hours ahead and reheated; assemble and bake just before serving to maintain crispness.
Tags
Crispy Baked Tacos
This Crispy Baked Tacos recipe makes perfectly juicy, tender, and flavorful steak every time! Serve with potatoes and a side salad for an unforgettable dinner in under 30 minutes.
Ingredients
For the tacos
Instructions
Preheat and arrange shells
Preheat oven to 400 degrees Fahrenheit. Stand the 10 wide hard corn shells upright in a 9 by 13 inch baking dish without overcrowding so heat circulates.
Sauté onions and brown beef
In a large skillet over medium-high heat, warm 1 tablespoon olive oil. Add 3/4 cup diced yellow onion and 1 1/2 pounds ground beef with 1/2 teaspoon salt and 1/4 teaspoon black pepper. Cook 8 to 10 minutes until no pink remains, breaking up the meat for even browning.
Drain excess grease
Tilt the pan or use a strainer to remove excess fat. Removing grease prevents soggy bottoms in the baked shells.
Add tomato sauce and seasoning
Stir in 3/4 cup tomato sauce and a 1 ounce packet of taco seasoning. Cook 2 to 3 minutes until the filling thickens slightly and absorbs the sauce.
Fill shells
Divide the filling evenly among the 10 shells, using about one third to one half cup per shell so each taco holds a generous portion without collapsing.
Top with cheese and bake
Sprinkle 1 1/2 cups shredded cheddar-jack over the filled shells. Bake in the preheated oven 5 to 7 minutes until cheese melts and shells are crisp.
Garnish and serve
Remove from oven, sprinkle with 1 tablespoon chopped cilantro if desired, and serve immediately with lime wedges and favorite toppings.
Last Step: Please leave a rating and comment letting us know how you liked this recipe! This helps our business to thrive and continue providing free, high-quality recipes for you.
Nutrition
Did You Make This?
Leave a comment & rating below or tag
@delishum on social media!
Categories:
You might also like...

Gooey Marshmallow Chocolate Brownies
Thick chocolate chunk brownies crowned with melted mini marshmallows and drenched in glossy chocolate frosting for the ultimate fudgy, crowd-pleasing bite.

Buttery Pecan Pie Bars
Buttery shortbread crust meets a lush brown sugar pecan topping. Crunchy, caramelly, and ready with just 10 minutes of prep for effortless indulgence.

No-Crack Pumpkin Cheesecake
Ultra-smooth pumpkin cheesecake with warm spice and a sturdy graham crust. A showstopper on its own, unforgettable with caramel and rum-kissed whipped cream.
Did You Make This?
Leave a comment & rating below or tag @delishum on social media!
Rate This Recipe
Share This Recipe
Enjoyed this recipe? Share it with friends and family, and don't forget to leave a review!
Comments (1)
This recipe looks amazing! Can't wait to try it.
Comments are stored locally in your browser. Server comments are displayed alongside your local comments.

Hi, I'm Amelia!
What's Popular

30-Minute Meals!
Join to receive our email series which contains a round-up of some of our quick and easy family favorite recipes.