
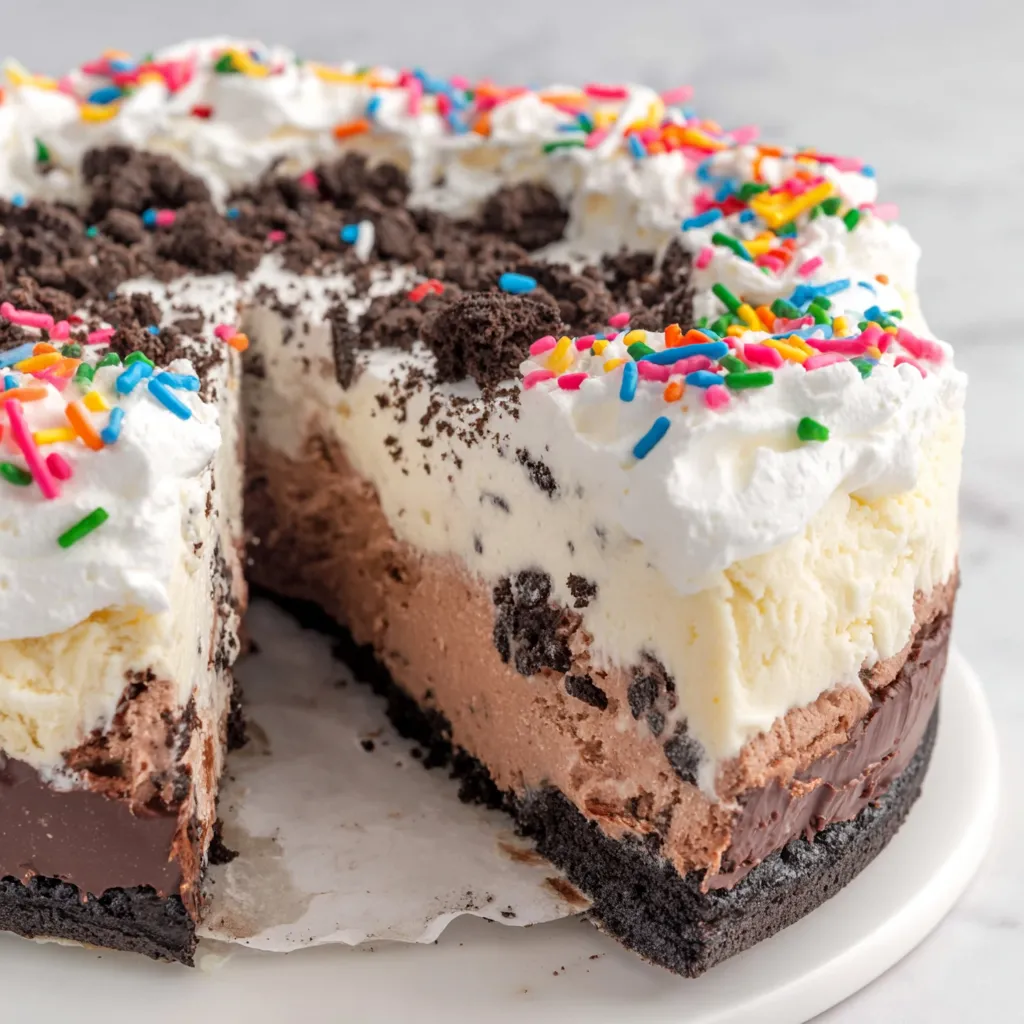
Copycat Dairy Queen Ice Cream Cake

A homemade version of the classic Dairy Queen ice cream cake with a crunchy cookie base, layers of chocolate and vanilla ice cream, hot fudge, and a cloud of whipped cream frosting.
This copycat Dairy Queen ice cream cake is my summer celebration staple — the recipe I turn to when birthdays, backyard barbecues, or last-minute gatherings call for something nostalgic and show-stopping. I first rebuilt this combination of crunchy cookie base, dense chocolate ice cream, glossy hot fudge, and light vanilla bean frosting one humid July after realizing the local shop was closed for renovations. The first bite transported everyone straight back to childhood: the contrast between the airy whipped cream and the satisfying cookie crunch, the way the hot fudge creates a silky boundary between chocolate and vanilla layers. It’s one of those desserts that invites conversation and second helpings.
What makes this version special is the balance of textures and the deliberate timing — baking the cookie crumbs briefly to set them, tempering the ice cream layers so they spread smoothly, and working quickly when assembling and decorating so nothing melts. I use a 9-inch springform pan lined with plastic wrap so the cake lifts cleanly, and I prefer vanilla bean for a flecked, aromatic top layer. Family members who claim not to like store-bought ice cream cake end up scraping the platter clean. If you love a retro dessert with modern technique, this one is worth the patience of freezing and the little bit of finesse at the end.
Why You'll Love This Recipe
- Makes a crowd-pleasing centerpiece — feeds about 10–12 people, perfect for parties and birthdays where you want both presentation and convenience.
- Uses simple, pantry-friendly ingredients: chocolate sandwich cookies, store-bought ice cream, and pantry hot fudge — no special equipment beyond a springform pan and a mixer.
- Ready to assemble in about 40 minutes active time, with freezing time that you can schedule around your day — the most hands-on time is just smoothing and piping.
- Highly adaptable: swap flavors to match seasonal produce or dietary needs (see variations below) while keeping the same structure and technique.
- Make-ahead friendly — you can freeze it for several weeks, which is perfect for planning desserts in advance.
- Kid-friendly decorating: piping shells and colorful sprinkles make it festive and fun to personalize.
In my kitchen, this became the cake everyone requests because it’s nostalgic and reliable. Once, I transported it to a picnic and the cake survived a hot car because I wrapped it in dry ice and a thermal bag — everyone kept asking for the “DQ cake” recipe afterward. The combination of crunchy crumbs, hot fudge, and fluffy frosting consistently gets raves.
Ingredients
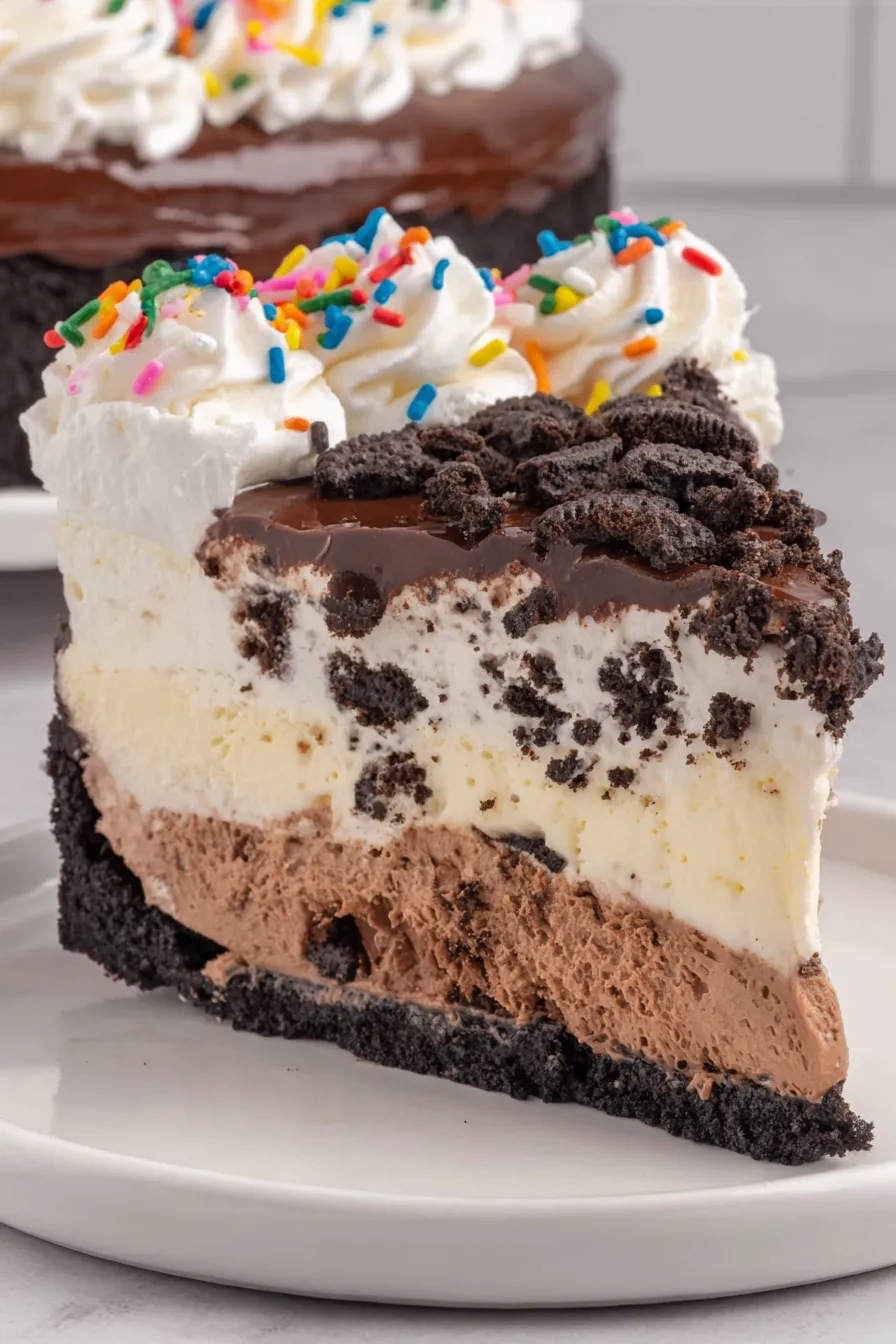
- Cookie Layer: 20 crushed chocolate sandwich cookies (with the cream centers intact) — choose a sturdy brand like Oreo or store-brand sandwich cookies. Crushing finely but not to dust gives the best texture; keeping the cream centers adds a little extra richness.
- Butter: 4 tablespoons salted sweet cream butter, melted — the butter binds the crumbs and lightly browns them in the oven. Unsalted can be used; add a pinch of salt if you do.
- Chocolate Ice Cream: 1 quart high-quality chocolate ice cream — pick a brand with intense chocolate flavor and a dense texture so the layer sets firm in the freezer.
- Vanilla Ice Cream: 1 quart vanilla ice cream (vanilla bean recommended) — the vanilla bean specks give aroma and a gourmet look when sliced.
- Hot Fudge Topping: 11.75 ounces (one standard jar) hot fudge — heat gently before spreading so it glazes smoothly without tearing the chocolate layer.
- Whipped Cream Frosting: 2 cups cold heavy cream, 1 1/4 cups powdered sugar, and 1 1/2 teaspoons clear vanilla flavoring — whip to stiff peaks for stable, pipeable frosting.
- Garnish: Colorful sprinkles (optional) — adds festive color and a playful crunch.
Instructions
Prepare the Pan: Line a 9-inch springform pan with plastic wrap, pressing the wrap up the sides so you can lift the cake out easily later. Set aside in the freezer to keep it cold while you prepare other components. Make the Cookie Base: Preheat the oven to 350°F. Line a 10x15-inch baking sheet with parchment paper. In a bowl, combine 20 crushed chocolate sandwich cookies with 4 tablespoons melted salted butter and toss until evenly coated. Spread the mixture in an even layer on the prepared sheet and bake for 7–8 minutes — you want the crumbs to be set and fragrant but not burnt. Allow crumbs to cool completely; cooling helps them firm up so they stay crumbly rather than greasy in the cake. Soften and Layer Chocolate Ice Cream: Remove 1 quart chocolate ice cream from the freezer and let it soften on the counter for 15–20 minutes until spreadable but not melted. Press an even layer of chocolate ice cream into the bottom of the lined springform pan using an offset spatula. Smooth the top and return the pan to the freezer for 30–60 minutes to firm. Heat and Spread Hot Fudge: Warm the 11.75-ounce jar of hot fudge in the microwave for 20–25 seconds so it’s pourable. Spread an even layer of hot fudge over the chilled chocolate ice cream using a flexible spatula. Immediately sprinkle the baked cookie crumbs evenly over the fudge to create a crunchy barrier. Return to the freezer for 1 hour so the fudge and crumbs set into a cohesive layer. Top with Vanilla Layer: Allow 1 quart vanilla (vanilla bean recommended) to soften for 15–20 minutes. Remove the springform pan from the freezer and smooth the vanilla ice cream over the cookie crumb layer. Level the top and return the pan to the freezer for 4–6 hours, or overnight for best slicing. Make the Whipped Frosting: About 30 minutes before decorating, chill your mixer bowl in the freezer for 30 minutes (metal bowl preferred). In the chilled bowl, combine 2 cups cold heavy cream, 1 1/4 cups powdered sugar, and 1 1/2 teaspoons clear vanilla flavoring. Beat on medium until sugar dissolves, then on high until stiff peaks form (roughly 3–4 minutes). Reserve 1 cup of frosting in a piping bag fitted with a large star tip for decorating. Assemble and Decorate: Work quickly. Remove the cake from the freezer, unclasp the springform rim, and use a cake lifter or large spatula to transfer the cake (with plastic wrap underneath) to a serving platter. Remove the plastic wrap. Using a spatula, frost the sides and top with the whipped frosting, smoothing quickly. Pipe shells or swirls around the edge using the reserved frosting and sprinkle colorful sprinkles on top. Return the finished cake to the freezer until ready to serve.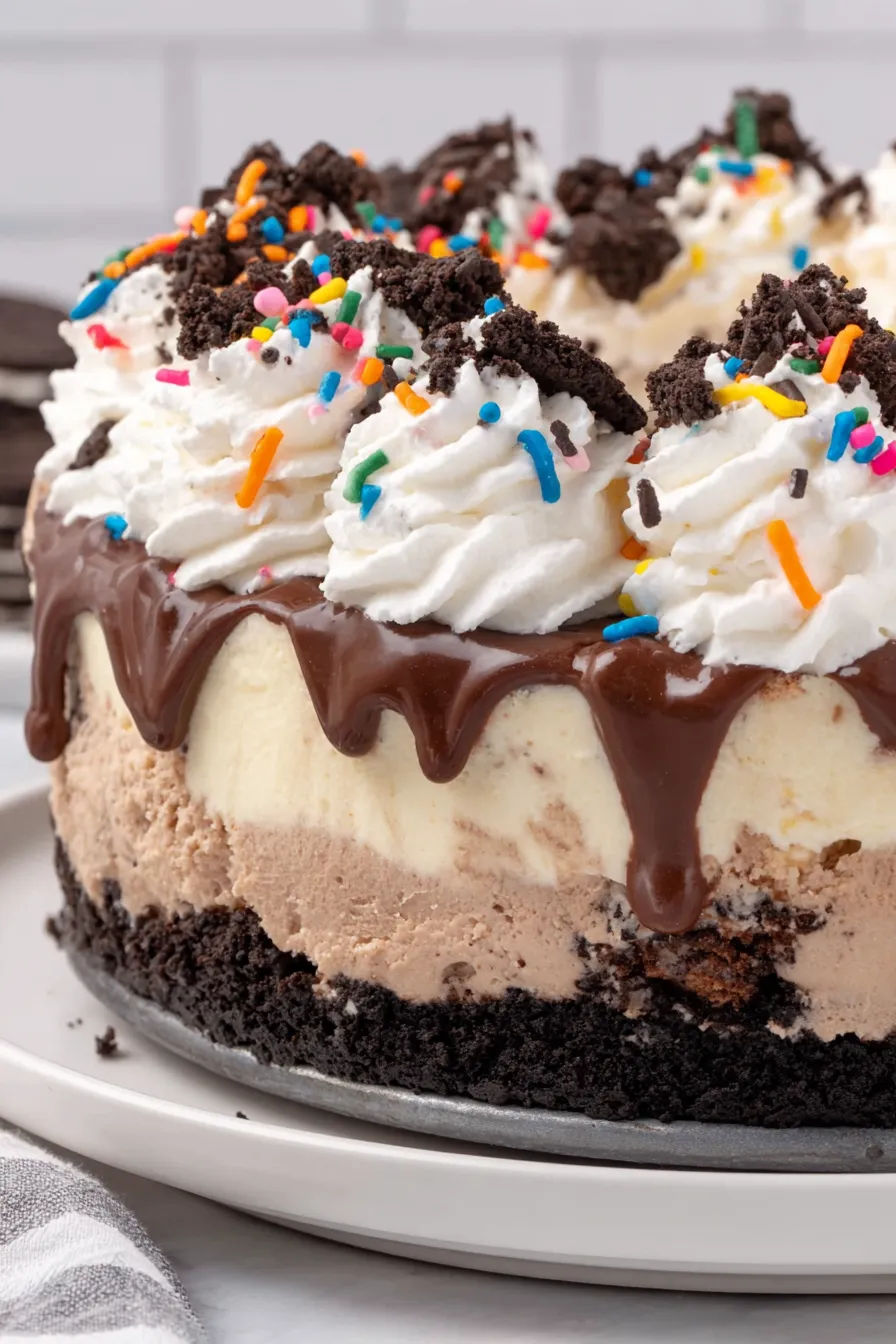
You Must Know
- The cake freezes very well for up to 3 months; wrap tightly in plastic wrap and aluminum foil to prevent freezer burn and ice crystals.
- Allow the cake to sit at room temperature for 8–10 minutes before slicing to get clean cuts without melting the frosting.
- This dessert is high in dairy and gluten — it is not suitable for dairy-free or gluten-free diets without substitutions.
- For travel, transport in a cooler with ice packs and keep it shaded until ready to serve to avoid softening.
My favorite part is how forgiving the process is: slight differences in ice cream brands or oven time for the crumbs won’t ruin it. My sister once swapped in a swirl ice cream and the cake still came out firm and delicious. Because most steps involve chilling rather than active cooking, you can space assembly throughout the day and still end up with a bakery-quality centerpiece.
Storage Tips
Store the cake in the freezer, tightly wrapped in plastic wrap and a layer of aluminum foil or in an airtight cake container to prevent odors and freezer burn. If you plan to keep it more than a week, place it in a dedicated deep freezer or add an additional airtight container around it. For serving, transfer individual slices to the refrigerator for up to 24 hours if you prefer a softer texture; otherwise keep the cake in the freezer and only thaw what you will serve immediately. Avoid frequent freeze-thaw cycles, which degrade texture and generate icy crystals.
Ingredient Substitutions
If you need to accommodate dietary needs, swap in dairy-free ice cream and whipped coconut cream for a vegan-friendly version — note that texture and stability will differ and the whipped topping may require stabilizers like a small amount of powdered agar or a commercial stabilizer. To make the crust gluten-free, use certified gluten-free chocolate sandwich cookies or a combination of gluten-free chocolate wafers and crushed pecans. For a lower-sugar cake, choose no-sugar-added ice cream and a sugar-free hot fudge, but expect slightly different freeze-firming behavior.
Serving Suggestions
Serve slices with an extra drizzle of warmed hot fudge, a few fresh berries for brightness, or a small scoop of sorbet on the side for contrast. For parties, place the cake on a decorated board and pipe the remaining frosting into extra rosettes as edible placecards. Seasonal additions like crushed peppermint in December or salted caramel drizzle in autumn pair beautifully with the chocolate-vanilla base.
Cultural Background
The layered ice cream cake concept is a classic American celebration dessert, popularized by quick-serve shops in the late 20th century. This copycat version pays homage to the Dairy Queen format — alternating textures and temperatures make these cakes feel celebratory and indulgent. Regional variations exist: some Midwest versions prefer a thicker cookie layer while coastal bakers often add fresh fruit between layers for brightness.
Seasonal Adaptations
Switch the hot fudge for salted caramel and add roasted pecans in the fall, or use strawberry ice cream and fresh strawberry compote between layers in the summer. For winter holidays, fold crushed candy canes into the whipped frosting and use chocolate peppermint ice cream for a festive twist. Lighten the cake for spring by adding a thin layer of lemon curd between ice cream layers for a refreshing tang.
Meal Prep Tips
Assemble the cake up to 24 hours in advance and keep it frozen until serving day. You can make the cookie crumbs up to a week ahead and store them airtight at room temperature. Prepare the whipped frosting shortly before decorating for the best texture, or use a stabilized whipped cream (add 1 tablespoon of instant vanilla pudding mix to the whipped cream) if you must frost the cake several hours before serving.
This cake has become our family’s summer tradition — a combination of nostalgia and technique that always brings people to the table. Whether you keep it classic or experiment with flavors, this copycat version hits the same joyful notes as the original while letting you tailor it to your taste.
Pro Tips
Chill your mixer bowl for 30 minutes before whipping for faster and more stable peaks.
Let the cake rest 8–10 minutes at room temperature before slicing for clean pieces.
Wrap the cake tightly in plastic wrap and foil if freezing for longer than a week to prevent freezer burn.
Warm the hot fudge for only 20–25 seconds so it’s spreadable but not runny.
This nourishing copycat dairy queen ice cream cake recipe is sure to be a staple in your kitchen. Enjoy every moist, high protein slice — it is perfect for breakfast or as a wholesome snack any time.
Tags
Copycat Dairy Queen Ice Cream Cake
This Copycat Dairy Queen Ice Cream Cake recipe makes perfectly juicy, tender, and flavorful steak every time! Serve with potatoes and a side salad for an unforgettable dinner in under 30 minutes.
Ingredients
Cookie Layer
Ice Cream Layer
Hot Fudge Layer
Whipped Cream Frosting
Instructions
Prepare the pan
Line a 9-inch springform pan with plastic wrap and chill in the freezer while assembling other components.
Bake cookie crumbs
Preheat oven to 350°F. Mix crushed cookies with melted butter, spread on a parchment-lined baking sheet, and bake 7–8 minutes. Cool completely.
Layer chocolate ice cream
Soften 1 quart chocolate ice cream for 15–20 minutes, spread evenly into the prepared pan, and freeze 30–60 minutes until firm.
Add hot fudge and crumbs
Warm hot fudge 20–25 seconds, spread over chocolate layer, sprinkle cooled cookie crumbs, and return to freezer for 1 hour.
Top with vanilla layer
Soften 1 quart vanilla ice cream for 15–20 minutes, spread over crumb layer, and freeze 4–6 hours or overnight.
Make whipped frosting
Chill mixing bowl for 30 minutes. Beat 2 cups cold heavy cream with 1 1/4 cups powdered sugar and 1 1/2 teaspoons clear vanilla until stiff peaks form. Reserve 1 cup for piping.
Decorate and serve
Remove cake from pan, lift out using plastic wrap, frost sides and top with whipped cream, pipe decorative shells, add sprinkles, then return to freezer until serving.
Last Step: Please leave a rating and comment letting us know how you liked this recipe! This helps our business to thrive and continue providing free, high-quality recipes for you.
Nutrition
Did You Make This?
Leave a comment & rating below or tag
@delishum on social media!
Categories:
You might also like...

Gooey Marshmallow Chocolate Brownies
Thick chocolate chunk brownies crowned with melted mini marshmallows and drenched in glossy chocolate frosting for the ultimate fudgy, crowd-pleasing bite.

Buttery Pecan Pie Bars
Buttery shortbread crust meets a lush brown sugar pecan topping. Crunchy, caramelly, and ready with just 10 minutes of prep for effortless indulgence.

No-Crack Pumpkin Cheesecake
Ultra-smooth pumpkin cheesecake with warm spice and a sturdy graham crust. A showstopper on its own, unforgettable with caramel and rum-kissed whipped cream.
Did You Make This?
Leave a comment & rating below or tag @delishum on social media!
Rate This Recipe
Share This Recipe
Enjoyed this recipe? Share it with friends and family, and don't forget to leave a review!
Comments (1)
This recipe looks amazing! Can't wait to try it.
Comments are stored locally in your browser. Server comments are displayed alongside your local comments.

Hi, I'm Amelia!
What's Popular

30-Minute Meals!
Join to receive our email series which contains a round-up of some of our quick and easy family favorite recipes.