
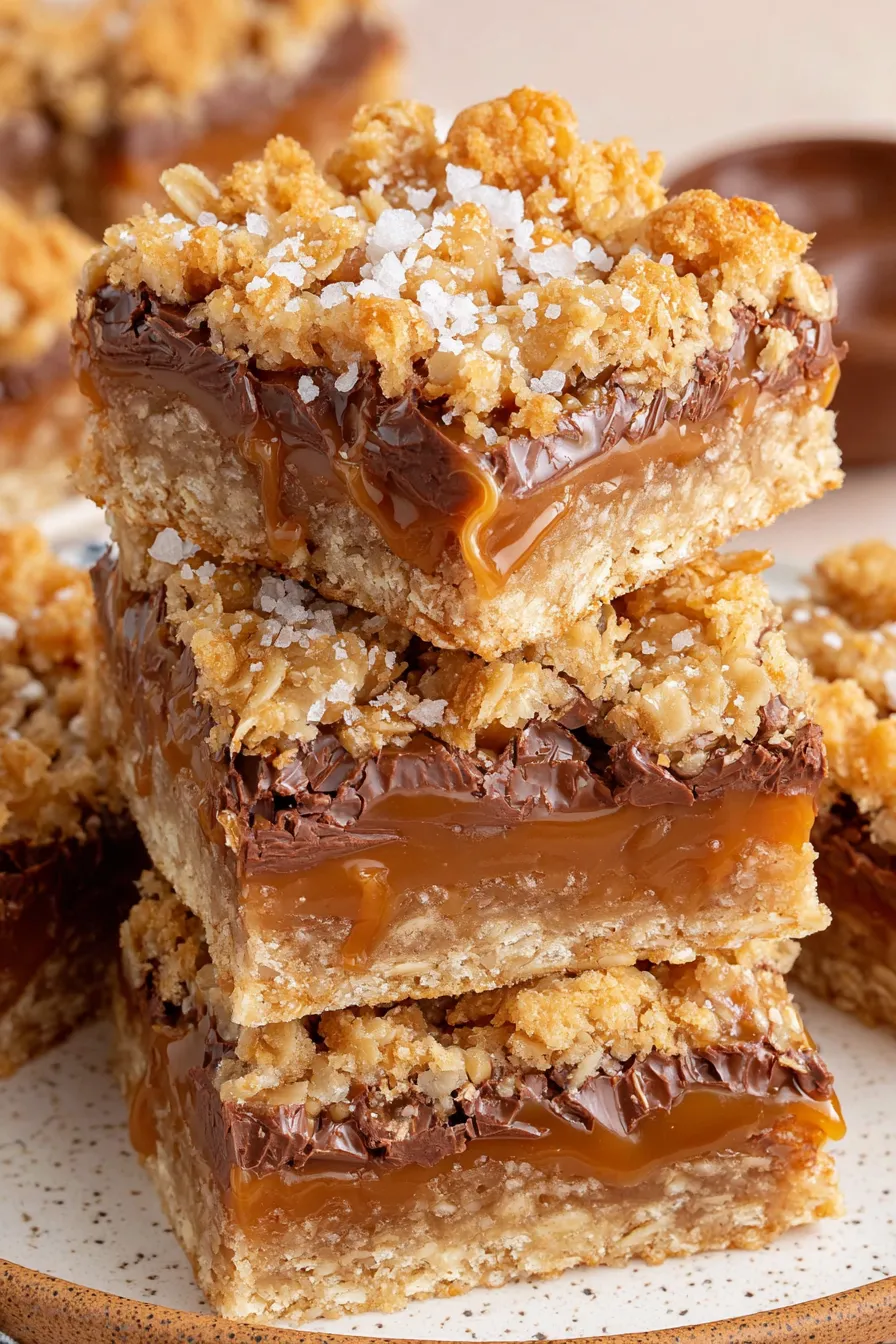
Carmelitas

Chewy oat-cookie bars layered with milk chocolate and a silky caramel sauce — a nostalgic, crowd-pleasing treat that’s easy to make and impossible to resist.
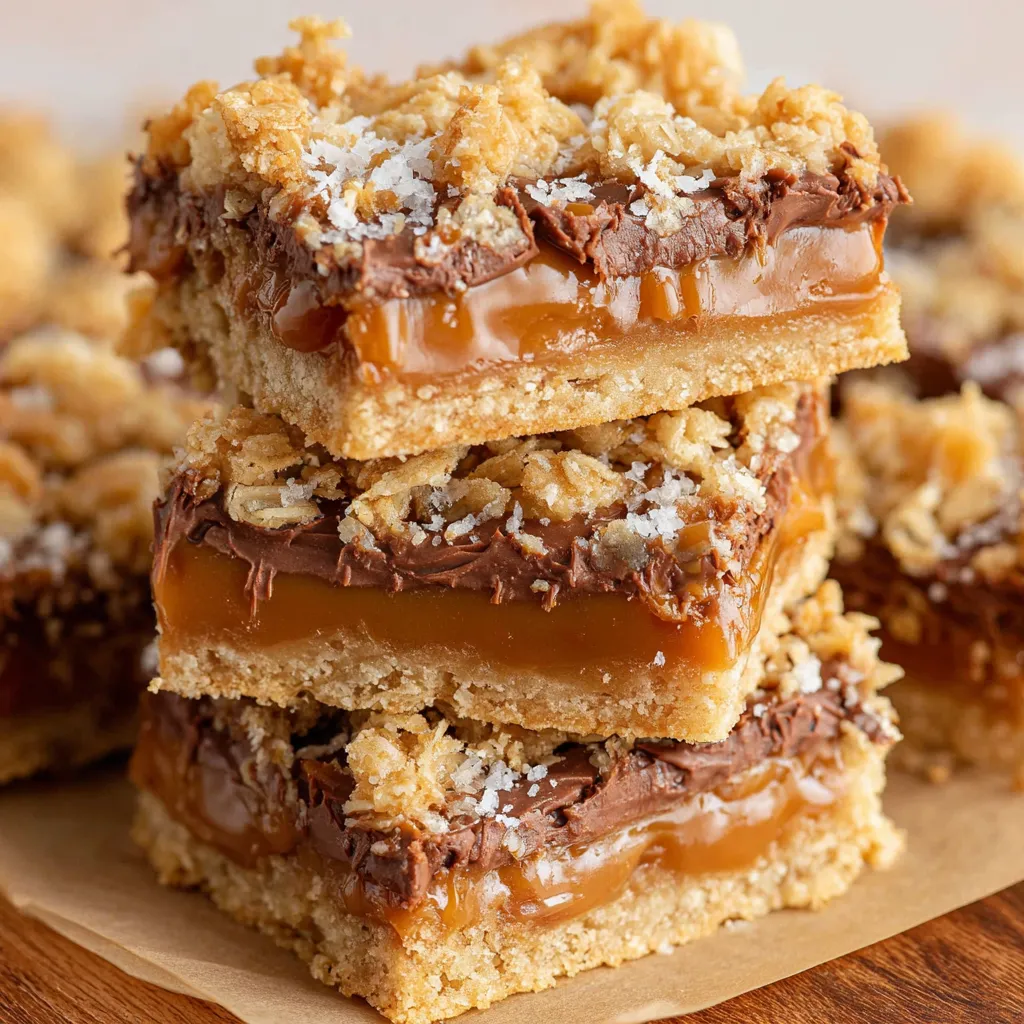
This recipe for carmelitas has lived on my countertop and in my memory for years. I first made these bars on a rainy Saturday when I pulled together pantry staples to cheer up a gloomy day, and the combination of buttery oat crust, melty milk chocolate, and deep, buttery caramel immediately felt like a small celebration. They are the kind of sweet that disappears fast at family gatherings: chewy, slightly crisp at the edges, and famously sticky in the center. Every bake fills the kitchen with a warm, caramel-sweet aroma that has become a shorthand for comfort in my house.
I love these bars because they travel well and are reliably loved by kids and adults alike. The texture is what sold me: the base is a tender, oat-forward cookie that holds its shape, while the chocolate and caramel layers create a soft, luxurious center. I discovered a few technique tweaks over time — like warming the chocolate slightly before adding caramel to prevent hard clumping, and using individually wrapped caramels melted with heavy cream for a glossy, pourable sauce — and those small steps make a huge difference to the finished result. Carmelitas have become my go-to gift for neighbors and potlucks because they look decadent but are incredibly straightforward.
Why You'll Love This Recipe
- One-bowl dough and simple pantry ingredients make it a quick weekend bake — active prep in about 20 minutes and hands-off baking time of 30 minutes.
- The oat-and-butter base creates a chewy, slightly crumbly texture that contrasts beautifully with the silky caramel and melted chocolate.
- Uses widely available ingredients: rolled oats, brown sugar, all-purpose flour, milk chocolate chips, and store-bought caramels — no specialty shopping required.
- Easy to scale up for parties: a 9×9 pan yields 16 uniform bars that are great for sharing, gifting, or packing into lunchboxes.
- Make-ahead friendly — fully chilled bars slice cleaner and keep well refrigerated for up to a week or frozen for longer storage.
- Kid-friendly and adaptable: swap the chocolate for dark chips or sea-salt caramels for a more sophisticated flavor profile.
These bars have prompted more than one dinner-table argument over who gets the last piece. My partner always insists on the corner pieces and my oldest requests a sprinkle of flaky sea salt on top; both are small rituals that make the bake feel special. Every time I bring them to a neighborhood bake sale, they’re the first to vanish — proof that simple, well-executed flavors win hearts.
Ingredients
- All-purpose flour (1½ cups): Provides structure to the base. Use a spoon-and-level method when measuring for accuracy; King Arthur or Gold Medal brands work reliably for even texture.
- Old-fashioned rolled oats (1½ cups): Gives chew and rustic texture. Avoid quick oats — the larger flakes hold moisture better and give that classic chewiness.
- Salted butter, melted (1 cup): Adds richness and helps bind the oat-flour mixture. If using unsalted, add an extra ½ teaspoon kosher salt to compensate.
- Light brown sugar, packed (¾ cup): Contributes caramel flavor and tenderizes the cookie layer. Dark brown sugar will deepen the molasses notes if you prefer a richer taste.
- Pure vanilla extract (2 teaspoons): Small but essential — it rounds and brightens all the sweet flavors.
- Baking soda (1 teaspoon): A small lift for the base so it isn’t overly dense.
- Kosher salt (½ teaspoon): Balances sweetness and enhances the caramel notes.
- Milk chocolate chips (1½ cups): Use a good-quality chip for glossy melting — Ghirardelli or Guittard melt reliably and taste chocolatey without bitterness.
- Individually wrapped caramels (11 ounces): The convenience of wrapped caramels gives consistent flavor; unwrap before melting.
- Heavy cream (½ cup): Adds silkiness to the caramel so it pours and sets with that luxurious chew we want in the center layer.
Instructions
Preheat and prepare pan: Set the oven to 350°F. Line a 9×9-inch baking dish with parchment paper, leaving an overhang on two sides to lift the bars out later. Lightly grease the parchment with nonstick spray — this helps ensure clean removal after chilling. Combine dry and wet base ingredients: In a large mixing bowl, stir together 1½ cups all-purpose flour, 1½ cups old-fashioned oats, ¾ cup packed light brown sugar, 1 teaspoon baking soda, and ½ teaspoon kosher salt until evenly distributed. Pour in 1 cup melted salted butter and 2 teaspoons vanilla, stirring just until everything is moistened and the mixture holds together when pressed. Overmixing will produce a tougher texture; stop once combined. Form base and parbake: Press about half of the oat mixture evenly and firmly into the bottom of the prepared pan — use the bottom of a measuring cup or your fingers to compact it. Bake the base for 10 minutes. The goal is a light set so the layers above won’t sink into the base. Melt caramels: While the base bakes, unwrap 11 ounces of individually wrapped caramels and combine them with ½ cup heavy cream in a small heavy-bottomed saucepan over medium-low heat. Stir slowly and continuously until the caramels are completely melted and glossy. Alternatively, microwave in 30–45 second bursts at medium power, stirring between intervals to avoid scorching. Assemble chocolate and caramel layers: When the base comes out of the oven, immediately sprinkle 1½ cups milk chocolate chips evenly across the hot base — the warmth helps the chips soften. Pour the warm caramel mixture in a steady layer over the chips; the heat will partially melt the chips and create a cohesive chocolate-caramel middle. Top and bake: Scatter the remaining half of the oat mixture over the caramel layer. Don’t worry if it looks patchy — gaps will close as it bakes. Return the pan to the oven and bake for 20 minutes, or until the top is golden brown and feels firm when gently pressed. Edges will be slightly darker and crisp. Cool and chill: Allow the bars to cool at room temperature for 10–15 minutes, then transfer to the refrigerator and chill for 1½ to 2 hours until fully set. Use the parchment overhang to lift the slab from the pan, place on a cutting board, and slice into 16 equal pieces. For the cleanest cuts, use a sharp knife wiped between slices.
You Must Know
- These bars are best after chilling: refrigeration firms the caramel so slices are neater and the texture is more balanced.
- They freeze well for up to 3 months; wrap individual bars in plastic and store in an airtight container to avoid freezer burn.
- Because of the butter and cream, keep them refrigerated if your kitchen is warm — caramel can become too sticky at room temperature above 70°F.
- One 9×9 pan yields 16 bars; each piece averages about 410 calories and is high in fat and sugar, so they’re best enjoyed in moderation.
My favorite thing about these bars is the contrast between the slightly crumbly oat exterior and the molten center. Years of baking taught me to trust the chill time — cutting too soon makes a sticky mess, while waiting allows clean slices and a satisfying bite. Family members often request these for holidays because they’re sturdy enough to transport yet indulgent enough to feel celebratory.
Storage Tips
Store fully cooled and chilled bars in an airtight container in the refrigerator for up to 7 days. Place sheets of parchment between layers to prevent sticking. For freezing, individually wrap bars in plastic and place them in a labeled freezer bag; they’ll keep for up to 3 months. To serve from frozen, unwrap and let thaw in the refrigerator overnight; bring to room temperature for 20–30 minutes before serving if you prefer a softer caramel texture.
Ingredient Substitutions
If you prefer deeper caramel notes, use dark brown sugar instead of light brown sugar in the base — expect a slightly moister crumb. Swap milk chocolate chips for semi-sweet or dark chocolate for a less sweet bar; use equal volume. For a dairy-free version, replace butter with a vegan buttery spread and use dairy-free caramel candies and non-dairy cream alternatives, but note the texture and set may differ. Gluten-free? Use a certified gluten-free all-purpose flour and certified gluten-free oats to accommodate sensitivities.
Serving Suggestions
Serve these bars slightly chilled with a sprinkling of flaky sea salt to lift the caramel. They pair beautifully with coffee, strong black tea, or a scoop of vanilla ice cream for an extra-indulgent dessert. For gatherings, arrange squares on a simple platter with paper doilies — their golden color looks gorgeous with seasonal fruit. For a brunch spread, offer alongside fresh berries and yogurt to balance sweetness.
Cultural Background
These bars are a North American classic often called "carmelitas" or chocolate caramel oat bars, evolving from simple oat cookie bars into a layered treat with the mid-20th-century popularity of individually wrapped caramels and chocolate chips. The combination of butter, brown sugar, oats and chocolate echoes American baking traditions that emphasize straightforward, comforting sweets — perfect for potlucks, bake sales, and family kitchens.
Seasonal Adaptations
In colder months, add ½ teaspoon ground cinnamon and a pinch of nutmeg to the base for a warming flavor. For the holidays, stir ½ cup chopped toasted pecans into the top oat layer or sprinkle chopped candied orange peel over the caramel before chilling for a festive twist. In summer, lighten the presentation with a squeeze of citrus zest on top to cut through the sweetness.
Meal Prep Tips
Make the base and chill it briefly before parbaking to streamline assembly on a busy day. You can store the cooled slab in the refrigerator for a day before topping and finishing if you need to split the work into two sessions. For grab-and-go breakfasts or snacks, portion bars into single-serve containers — they’re portable and satisfying, but remember they’ll soften at warm temperatures.
These carmelitas capture the joy of simple ingredients elevated by attention to texture and timing. Whether for a weekday treat or a festive spread, they’re a dependable crowd-pleaser. I hope you make them, personalize them, and pass them along — that’s how the best recipes become family traditions.
Pro Tips
Press the base firmly into the pan for an even, compact crust that won't crumble when sliced.
Warm the chocolate slightly by sprinkling it on the hot base so the caramel bonds the layers together.
Use a sharp knife wiped clean between cuts for neat, attractive bars.
Chill for the recommended time — cutting too soon yields messy, sticky slices.
This nourishing carmelitas recipe is sure to be a staple in your kitchen. Enjoy every moist, high protein slice — it is perfect for breakfast or as a wholesome snack any time.
FAQs about Recipes
Can I melt the caramels in the microwave?
Yes — you can make the caramel on the stovetop by gently heating unwrapped caramels with heavy cream over medium-low heat until smooth, or microwave in 30–45 second bursts, stirring between intervals.
Why should I chill the bars before cutting?
Chill the assembled bars at least 1½–2 hours; this firms the caramel and makes slicing much cleaner. For the best shape, refrigerate before cutting.
Tags
Carmelitas
This Carmelitas recipe makes perfectly juicy, tender, and flavorful steak every time! Serve with potatoes and a side salad for an unforgettable dinner in under 30 minutes.
Ingredients
Cookie Base
Chocolate and Caramel Layer
Instructions
Preheat and prepare pan
Preheat oven to 350°F. Line a 9×9-inch baking dish with parchment, leaving an overhang on two sides for easy removal. Lightly grease parchment with nonstick spray.
Mix base ingredients
In a large bowl, combine 1½ cups flour, 1½ cups oats, ¾ cup packed light brown sugar, 1 teaspoon baking soda, and ½ teaspoon kosher salt. Add 1 cup melted salted butter and 2 teaspoons vanilla and stir until the mixture holds together when pressed; avoid overmixing.
Press and parbake the base
Press half of the oat mixture evenly into the prepared pan using the bottom of a measuring cup to compact. Bake for 10 minutes until just set.
Melt caramels with cream
While the base bakes, unwrap 11 ounces caramels and combine with ½ cup heavy cream in a small heavy-bottomed saucepan over medium-low heat, stirring continuously until smooth and glossy; alternatively, microwave in 30–45 second bursts, stirring between intervals.
Assemble chocolate and caramel layers
Immediately after removing the parbaked base, sprinkle 1½ cups milk chocolate chips evenly over the hot base. Pour the warm caramel mixture over the chips to form the middle layer.
Top with remaining base and bake
Crumble and sprinkle the remaining oat mixture over the caramel layer. Bake for 20 minutes or until the top is golden brown and firm to the touch.
Cool, chill, and slice
Cool at room temperature for 10–15 minutes, then refrigerate for 1½–2 hours until set. Use parchment overhang to lift the slab, place on a board, and slice into 16 pieces using a sharp knife wiped between cuts.
Last Step: Please leave a rating and comment letting us know how you liked this recipe! This helps our business to thrive and continue providing free, high-quality recipes for you.
Nutrition
Did You Make This?
Leave a comment & rating below or tag
@delishum on social media!
Categories:
You might also like...

Gooey Marshmallow Chocolate Brownies
Thick chocolate chunk brownies crowned with melted mini marshmallows and drenched in glossy chocolate frosting for the ultimate fudgy, crowd-pleasing bite.

Buttery Pecan Pie Bars
Buttery shortbread crust meets a lush brown sugar pecan topping. Crunchy, caramelly, and ready with just 10 minutes of prep for effortless indulgence.

No-Crack Pumpkin Cheesecake
Ultra-smooth pumpkin cheesecake with warm spice and a sturdy graham crust. A showstopper on its own, unforgettable with caramel and rum-kissed whipped cream.
Did You Make This?
Leave a comment & rating below or tag @delishum on social media!
Rate This Recipe
Share This Recipe
Enjoyed this recipe? Share it with friends and family, and don't forget to leave a review!
Comments (1)
This recipe looks amazing! Can't wait to try it.
Comments are stored locally in your browser. Server comments are displayed alongside your local comments.

Hi, I'm Amelia!
What's Popular

30-Minute Meals!
Join to receive our email series which contains a round-up of some of our quick and easy family favorite recipes.